Exploring the new 'faces' parameter in image face detection

It has been a while since the /image/facedetect
Robot has made an appearance in a blog. And what better time to talk about it than with
its latest iteration, the faces parameter.
The /image/facedetect Robot automatically pinpoints where faces are on an image, returns the coordinates, crops around a group or creates completely new images of every face found.

Showcasing the new parameter's features
Prior to this update, the /image/facedetect Robot would crop out every face found. So, if you had an image containing five faces, you would end up with five smaller images that each contain a single face.
While this option is still present and has proved to be rather helpful, there are other
circumstances where this is not enough. To make up for the Robot's shortcomings, the new
faces parameter comes into play with its ability to control which face is used for cropping based
on certain attributes of the image used.
The following demonstration makes use of a free image found on Unsplash.
Getting to know the new parameter values
Here's a look at the script I made in Python for testing out the new parameter:
# pip install pytransloadit
from transloadit import client

tl = client.Transloadit('YOUR_TRANSLOADIT_KEY', 'YOUR_TRANSLOADIT_SECRET')

assembly = tl.new_assembly()
assembly.add_file(open("test.jpg", "rb"))
assembly.add_step("face-detect", "/image/facedetect", { "crop": True, "faces": "each"} )

# Start the Assembly
response = assembly.create(wait=True)

result_url = response.data.get('results').get('face-detect')

print("Your result:", result_url) #returns a url containing the result of the program
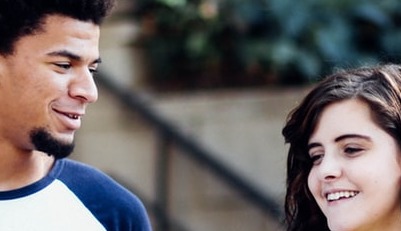
In the program above, we use the following input image:

Be sure to replace YOUR_TRANSLOADIT_KEY and YOUR_TRANSLOADIT_SECRET with your actual account's
keys. You can find them in your account's API Settings.
In the examples below, I will only be showing the part of the code that has been changed with a new
value for the faces parameter, i.e., line 8.
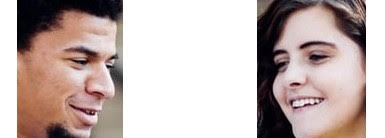
Value: "group"
This is a brand new feature. group works by determining where faces are within an image and
grouping them together.
assembly.add_step("face-detect", "/image/facedetect", { "crop": True, "faces": "group"} )
From this, we can see the following results:
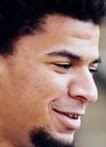
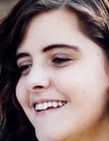
Value: "each"
This is the original mode of operation and the default. "each" is used to return every face
individually. This can prove to be useful for extracting many avatars from a single school photo or
perphaps to easily find out how many faces are featured in an image.
assembly.add_step("face-detect", "/image/facedetect", { "crop": True, "faces": "each"} )
From this, we can see the following results:
Value: "max-confidence"
Thirdly, we'll look at what happens when you set faces to the "max-confidence" value. You'll see
it takes the image and outputs the single face with the highest confidence value. This value is set
using a neural network behind the scenes, providing us with a confidence value indicating the degree
of certainty that the detected part actually contains a face. This is useful for automatically
cropping an avatar.
assembly.add_step("face-detect", "/image/facedetect", { "crop": True, "faces": "max-confidence"} )
From this, we can see the following results:
Value: "max-size"
The fourth value being looked at is "max-size". This value calculates which of the found faces has
the largest surface area and outputs the result. This will extract the dominant face from an image,
but not necessarily the one with the highest confidence value.
assembly.add_step("face-detect", "/image/facedetect", { "crop": True, "faces": "max-size"} )
From this, we can see the following results:
Value: Integer
The fifth and final value being looked at is, well, any integer. This value picks a face from the
image using an index, where each face within the image is sorted from the top left corner. This is
useful if you want an end-user to pick a face in two passes. Or perhaps you want to pick the
second-to-left person from a picture, in which case you'd specify 1 as this number is
zero-indexed.
assembly.add_step("face-detect", "/image/facedetect", { "crop": True, "faces": "faces:1"} )
From this, we can see the following results:
This brings us to the end of our overview of the
/image/facedetect Robot's new faces parameter.
We look forward to seeing what you'll build with these new features in combination with
all the other Robots/features at your disposal.