

Three.js と Transloadit で 360° 動画プレーヤーを作るには

思い出を 360° 動画に残すと、まったく新しい感覚で追体験できます。VR はまだ広く普及していないため、今回は Three.js と Uppy、そしてもちろん Transloadit を使い、自分の 360° 動画をアップロードしてノートパソコンで視聴できるプレーヤーを作成します。
動画の投影
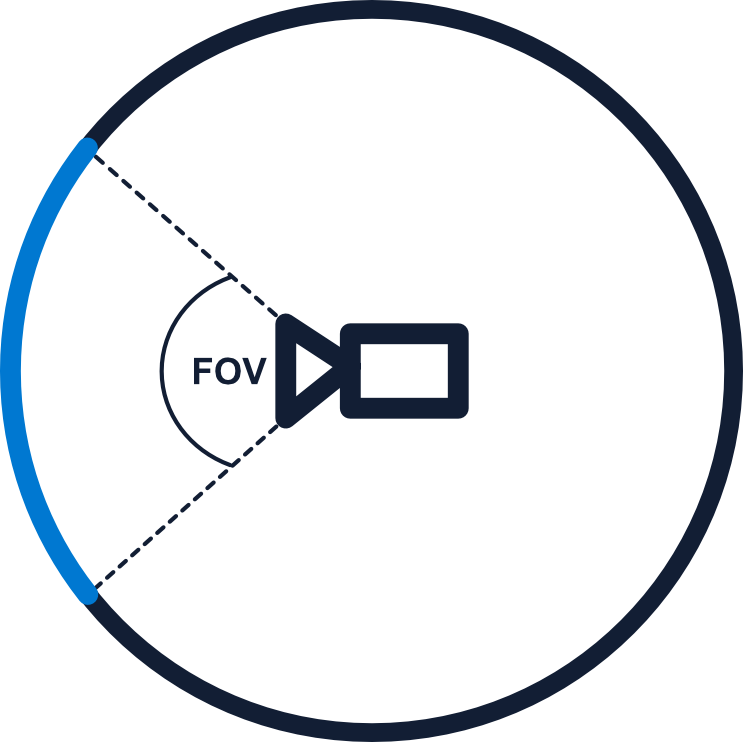
動画プレーヤーの中心となるのは、当然ながら動画の表示です。通常の 2D 動画なら簡単ですが、今回の用途では <video> 要素だけでは不十分です。そこで Three.js を使い、正距円筒図法の動画を球の内側の表面に投影します。球の内部にカメラを配置すると、実際にその場にいるかのように周囲を見渡せます。下の図はその仕組みを示しています。
Three.js でこれを実現するには、まず Scene、PerspectiveCamera、WebGLRenderer、OrbitControls の各オブジェクトを作成します。
viewport メタタグを含む HTML ドキュメントを用意します。ドキュメントの head 内で、すべてのモジュールスクリプトより前に次のインポートマップを追加します。Three.js とそのアドオンには、同じ固定バージョンを使用します。
<meta name="viewport" content="width=device-width, initial-scale=1.0" />
<script type="importmap">
  {
    "imports": {
      "three": "https://cdn.jsdelivr.net/npm/three@0.177.0/build/three.module.js",
      "three/addons/": "https://cdn.jsdelivr.net/npm/three@0.177.0/examples/jsm/"
    }
  }
</script>
以下の JavaScript ブロックをひとつの <script type="module"> にまとめ、アップロードのセクションにある HTML コントロールの後に配置します。OrbitControls は独立したモジュールであり、THREE オブジェクトのプロパティではありません。
import * as THREE from 'three'
import { OrbitControls } from 'three/addons/controls/OrbitControls.js'

const scene = new THREE.Scene()
const camera = new THREE.PerspectiveCamera(75, window.innerWidth / window.innerHeight, 1, 100)
const renderer = new THREE.WebGLRenderer()
const controls = new OrbitControls(camera, renderer.domElement)
const radius = 30
const status = document.getElementById('status')
次に、シーン内のオブジェクトを初期化します。まずは各種プロパティを調整した動画を作成します。
controls.enablePan = false
controls.enableZoom = false

// Points the camera at the horizon by default
// Also moves the camera away for the OrbitControls target slightly so it works
let spherical = new THREE.Spherical(1, Math.PI / 2, 0)
spherical.makeSafe()
camera.position.setFromSpherical(spherical)

const video = document.createElement('video')
video.loop = true
video.muted = true
video.playsInline = true
video.crossOrigin = 'anonymous'
function showVideoError() {
  status.textContent = 'The video could not be loaded. Check its format and cross-origin access headers.'
}
function playVideo() {
  return video.play().then(() => {
    status.textContent = 'Your video is ready.'
  }).catch((error) => {
    if (error.name === 'NotAllowedError') {
      status.textContent = 'Select Play to start the video.'
    } else if (error.name !== 'AbortError') {
      showVideoError()
    }
  })
}
video.addEventListener('error', showVideoError)
video.src = 'https://threejs.org/examples/textures/pano.mp4'
playVideo()
document.getElementById('play-button').addEventListener('click', () => {
  if (!video.paused) {
    video.pause()
    return
  }
  playVideo()
})

renderer.setPixelRatio(Math.min(window.devicePixelRatio, 2))
renderer.setSize(window.innerWidth, window.innerHeight)
document.body.appendChild(renderer.domElement)

const texture = new THREE.VideoTexture(video)
texture.colorSpace = THREE.SRGBColorSpace
const geometry = new THREE.SphereGeometry(radius, 48, 32)
geometry.scale(-1, 1, 1)
const material = new THREE.MeshBasicMaterial({ map: texture })

const sphere = new THREE.Mesh(geometry, material)
scene.add(sphere)
最初のクリップには、Three.js の動画サンプルのパノラマを使います。必要に応じて、自分の正距円筒図法の動画に置き換えてください。WebGL でテクスチャとして使用するには、リモート動画のレスポンスでクロスオリジンアクセスを許可する必要があります。crossOrigin を設定するだけでは許可されません。これは最初のクリップにも、S3 にエクスポートした結果にも当てはまります。サイトのオリジンからの読み取りを許可するよう、バケットの CORS ポリシーを設定してください。
まだ何も表示されないのは、シーンのレンダリングを開始していないためです。animate 関数を作成し、その中に
requestAnimationFrame 関数と render 関数を含めます。
function animate() {
  requestAnimationFrame(animate)

  renderer.render(scene, camera)
}

animate()
これで動画が再生され、OrbitControls アドオンで周囲を見渡せるようになりました。ただし、ウィンドウのサイズを変更すると、拡大縮小の表示が不自然になることがあります。さっそく修正しましょう。
window.addEventListener('resize', onWindowResize)

function onWindowResize() {
  camera.aspect = window.innerWidth / window.innerHeight
  camera.updateProjectionMatrix()

  renderer.setSize(window.innerWidth, window.innerHeight)
}
上の関数の仕組みはシンプルです。ウィンドウのサイズ変更を監視し、変更されたら、新しい画面サイズに合わせてカメラのアスペクト比とレンダラーのサイズを更新します。
ズーム操作の追加
ズームの追加も簡単です。OrbitControls にもズーム機能はありますが、この動画プレーヤーには完全には適していないので、自分で実装します。スクロールホイールのイベントリスナーとハンドラーを作成し、スクロール量に応じてカメラの視野角(FoV)を更新するとともに、投影行列も更新します。
renderer.domElement.addEventListener('wheel', handleZoom)

function handleZoom(e) {
  camera.fov = THREE.MathUtils.clamp(camera.fov + e.deltaY / 10, 10, 100)
  camera.updateProjectionMatrix()
}
たったこれだけで実装できます!
Uppy による動画のアップロード
次は、ユーザーが自分の動画をアップロードできるよう、プレーヤーの周辺機能を拡張します。まず、基本的な UI を用意します。
<div class="floating-box">
  <h2 class="title">Upload a 360° file to view</h2>
  <button id="play-button" type="button">Play / pause</button>
  <p id="status" role="status"></p>
  <!--- from https://loading.io/css/ -->
  <div class="lds-ellipsis" id="loading-dots">
    <div></div>
    <div></div>
    <div></div>
    <div></div>
  </div>
  <div id="container">
    <label for="file-input">Equirectangular video</label>
    <input type="file" id="file-input" accept="video/*" required />
    <button id="submit-button">Submit</button>
  </div>
</div>
body {
  margin: 0;
}

canvas {
  display: block;
}

.floating-box {
  position: absolute;
  z-index: 10;
  top: 16px;
  left: 16px;
  box-sizing: border-box;
  width: min(320px, calc(100vw - 32px));
  max-height: calc(100vh - 32px);
  overflow: auto;
  background: #fff;
  display: flex;
  flex-direction: column;
  padding: 20px;
  align-items: center;
  padding-top: 0px;
  justify-items: center;
  font-family: Helvetica;
}

#container {
  display: flex;
  flex-direction: column;
  gap: 8px;
}

.lds-ellipsis {
  display: inline-block;
  position: relative;
  width: 80px;
  height: 80px;
}
.lds-ellipsis div {
  position: absolute;
  top: 33px;
  width: 13px;
  height: 13px;
  border-radius: 50%;
  background: #000;
  animation-timing-function: cubic-bezier(0, 1, 1, 0);
}
.lds-ellipsis div:nth-child(1) {
  left: 8px;
  animation: lds-ellipsis1 0.6s infinite;
}
.lds-ellipsis div:nth-child(2) {
  left: 8px;
  animation: lds-ellipsis2 0.6s infinite;
}
.lds-ellipsis div:nth-child(3) {
  left: 32px;
  animation: lds-ellipsis2 0.6s infinite;
}
.lds-ellipsis div:nth-child(4) {
  left: 56px;
  animation: lds-ellipsis3 0.6s infinite;
}
@keyframes lds-ellipsis1 {
  0% {
    transform: scale(0);
  }
  100% {
    transform: scale(1);
  }
}
@keyframes lds-ellipsis3 {
  0% {
    transform: scale(1);
  }
  100% {
    transform: scale(0);
  }
}
@keyframes lds-ellipsis2 {
  0% {
    transform: translate(0, 0);
  }
  100% {
    transform: translate(24px, 0);
  }
}
ここで Uppy を導入します。まずインポートし、Transloadit プラグインを初期化します。
このインポートと以下のアップロード用コードは、上の Three.js コードと同じモジュールスクリプトに追加してください。別々のモジュールスクリプト間では、video とステータス要素の変数は共有されません。
import { Uppy, Transloadit } from 'https://releases.transloadit.com/uppy/v3.13.0/uppy.min.mjs'

const uppy = new Uppy({
  restrictions: {
    allowedFileTypes: ['video/*'],
    maxNumberOfFiles: 1,
  },
  autoProceed: false,
})
uppy.use(Transloadit, {
  waitForEncoding: true,
  assemblyOptions: {
    params: {
      auth: { key: 'AUTH_KEY' },
      template_id: 'TEMPLATE_ID',
    },
  },
})
uppy.on('transloadit:complete', setSrc)
AUTH_KEY フィールドと TEMPLATE_ID フィールドには、Transloadit Consoleの値を必ず入力してください。
一般公開する前に、サーバーで生成した署名を使用し、サーバー側でアップロードを認可してください。ブラウザーのコードに Auth Secret を含めないでください。
次に、送信ボタンにイベントリスナーを追加し、クリック時に Transloadit へのアップロードを開始します。また、ボタンのコンテナーと読み込み中を示すドット用の変数を作成し、ドットは最初は非表示にしておきます。
const submit = document.getElementById('submit-button')
submit.addEventListener('click', uploadVideo)

const container = document.getElementById('container')

const loadingDots = document.getElementById('loading-dots')
loadingDots.style.display = 'none'

async function uploadVideo() {
  const input = document.getElementById('file-input')
  const file = input.files[0] // should only ever be one
  if (file == null) return
  uppy.cancelAll()
  container.style.display = 'none'
  loadingDots.style.display = 'block'
  submit.disabled = true
  status.textContent = 'Processing video.'
  try {
    uppy.addFile({ name: file.name, type: file.type, data: file })
    const result = await uppy.upload()
    if (result.failed.length > 0) throw new Error('Video upload failed.')
  } catch {
    status.textContent = 'Video processing failed. Please try again.'
  } finally {
    container.style.display = 'flex'
    loadingDots.style.display = 'none'
    submit.disabled = false
    input.value = ''
  }
}
先ほど、setSrc 関数を
transloadit:complete イベント内で参照していたことに気づいたかもしれません。この関数は、Assembly Status JSON から動画の URL を取得し、動画要素のソースをその URL に更新するだけです。ここで作成しましょう。
function setSrc(assembly) {
  const url = assembly.results.encode_360?.[0]?.ssl_url
  if (typeof url !== 'string') {
    status.textContent = 'No video was returned. Please try again.'
    return
  }
  video.src = url
  video.load()
  status.textContent = 'Loading video.'
  playVideo()
}
必ず video.load() と video.play() を呼び出してください。これにより要素がソースを再読み込みし、プレーヤー内の動画が更新されます。
Transloadit での Template 作成
ここまで実装しても、ファイルのアップロードはまだ動作しません。最後に必要なのは、アップロードされた動画を処理してクライアントに返す Template の作成です。
{
  "steps": {
    ":original": {
      "robot": "/upload/handle"
    },
    "encode_360": {
      "use": ":original",
      "robot": "/video/encode",
      "ffmpeg_stack": "v7",
      "preset": "webm"
    },
    "exported": {
      "use": ["encode_360"],
      "robot": "/s3/store",
      "credentials": "YOUR_AWS_CREDENTIALS",
      "result": true
    }
  }
}
上の Template は、アップロードされた動画を統一した形式にトランスコードし、長期保存のために S3 にエクスポートします。Transloadit でのファイル保存は一時的なもので、24 時間後には削除されるためです。YOUR_AWS_CREDENTIALS を、保存済みの
Template 認証情報の名前に置き換えてください。サンプルに S3 のシークレットを貼り付けないでください。
まとめ
これですべての要素がそろい、360° 動画プレーヤーがうまく動作するはずです。X(Twitter)で、どのようにできたかぜひ教えてください。Transloadit を使って作ったほかの作品もお待ちしています!