
Building a recipe app with Transloadit & Flutter pt. 1

After recently working on the Flutter SDK, I thought it would be appropriate to demo a small app. Today, we're designing a food app that allows us to choose a dish, 'cook' it, and receive a receipt, which can be accessed by tapping a Firebase notification.
This blog is the first of two parts. We'll build out the UI in this part, with functionality being added in the following post.
Put your chef hat and apron on, and let's get cooking!

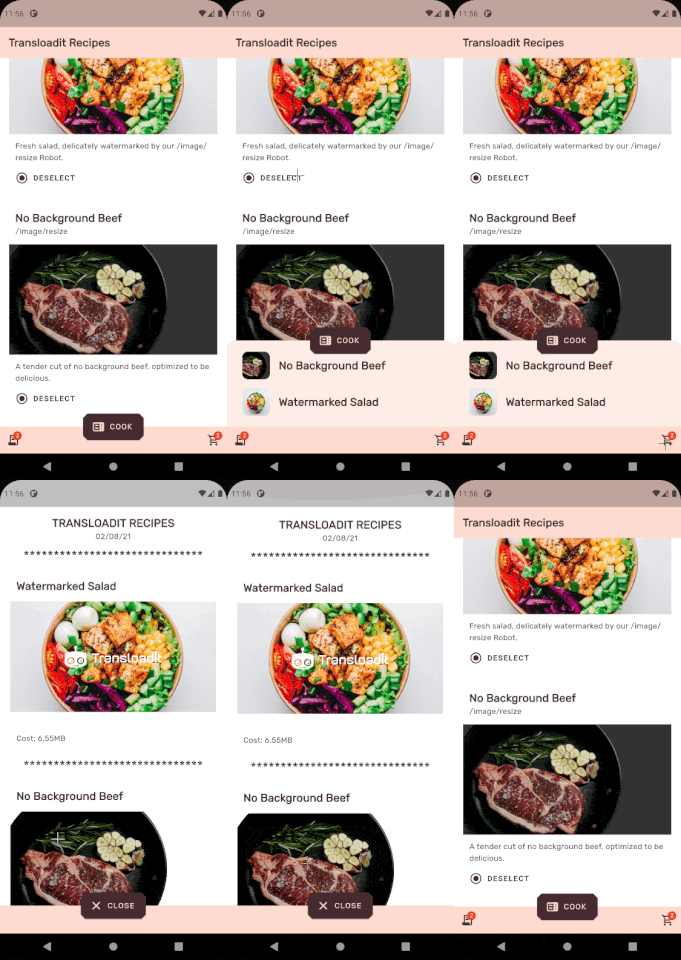
Taking a sneak peek, at the end of this blog, you will have an app that looks like this:
Setting up the app
First things first, create a new Flutter project with:
flutter create transloadit_recipes
Run flutter doctor to make sure your setup is working, then navigate to lib/, and create five new
folders: /defs, /res, /screens, /utils, and /widgets.
Next, let's install some packages inside of pubspec.yaml. Modify your dependencies as shown below,
then run flutter pub get.
dependencies:
  flutter:
    sdk: flutter

  transloadit: ^0.1.2
  path_provider: ^2.0.2
  intl: ^0.17.0
  firebase_remote_config: ^0.10.0+3
  firebase_core: ^1.4.0
  firebase_messaging: ^10.0.4
  cloud_functions: ^3.0.0
  flutter_local_notifications: ^6.0.0
Back in the root of your project folder, we need to set up some assets. Create a new
../../../../../../_assets/images folder, and add these files:


Inside of assets/fonts, add
Rubik regular.
Now update pubspec.yaml with the data below.
flutter:
  uses-material-design: true

  fonts:
    - family: Rubik
      fonts:
        - asset: assets/fonts/Rubik-Regular.ttf

  assets:
    - assets/images/
Theming our app
Let's start work on our custom theme.
Create /lib/res/colors.dart so we can define some custom colors.
lib/res/colors.dart
import 'package:flutter/material.dart';

class CustomColors {
  static final Color peach = Color(0xFFFEDBD0);
  static final Color lightPeach = Color(0xFFFEECE6);
  static final Color brown = Color(0xFF442C2E);
}
Inside the same folder, create theme.dart to define a custom light theme that we will apply
universally to our app's UI.
lib/res/theme.dart
import 'package:flutter/material.dart';

import 'colors.dart';

class CustomTheme {
  static ThemeData get lightTheme {
    return ThemeData(
      primaryColor: CustomColors.peach,
      scaffoldBackgroundColor: Colors.white,
      accentColor: CustomColors.brown,
      textTheme: TextTheme(
        bodyText1: TextStyle(
          color: CustomColors.brown,
          letterSpacing: 0.25,
          height: 1.5,
        ),
        headline6: TextStyle(
            color: CustomColors.brown,
            fontWeight: FontWeight.bold,
            letterSpacing: 0.15),
      ),
      appBarTheme: AppBarTheme(elevation: 0),
      fontFamily: 'Rubik',
      buttonTheme: ButtonThemeData(
        buttonColor: Colors.transparent,
        textTheme: ButtonTextTheme.accent,
      ),
      textButtonTheme: TextButtonThemeData(
        style: TextButton.styleFrom(
          primary: CustomColors.brown,
          textStyle:
              TextStyle(fontWeight: FontWeight.bold, letterSpacing: 1.25),
        ),
      ),
      bottomSheetTheme: BottomSheetThemeData(
        backgroundColor: CustomColors.lightPeach,
        shape: BeveledRectangleBorder(
          borderRadius: BorderRadius.only(
            topLeft: Radius.circular(8.0),
            topRight: Radius.circular(8.0),
          ),
        ),
      ),
      bottomAppBarTheme: BottomAppBarTheme(color: CustomColors.peach),
      floatingActionButtonTheme: FloatingActionButtonThemeData(
        backgroundColor: CustomColors.brown,
        foregroundColor: CustomColors.peach,
        elevation: 1,
        shape: BeveledRectangleBorder(
          borderRadius: BorderRadius.all(
            Radius.circular(8.0),
          ),
        ),
      ),
    );
  }
}
Setting up our scaffolding
We're going to try to set up some basic UI on our homepage. But before we can do that, we'll need to
modify main.dart.
main.dart
import 'package:firebase_core/firebase_core.dart';
import 'package:firebase_remote_config/firebase_remote_config.dart';
import 'package:flutter/material.dart';
import 'package:transloadit/transloadit.dart';

import 'defs/food.dart';
import 'defs/response.dart';
import 'res/foods.dart';
import 'res/theme.dart';
import 'screens/receipt_page.dart';
import 'screens/home_page.dart';

List<Food> foods = [Foods.salad, Foods.beef, Foods.lamb];
ValueNotifier<List<Response>> results = ValueNotifier<List<Response>>([]);
ValueNotifier<bool> isLoading = ValueNotifier<bool>(false);
PersistentBottomSheetController? controller;
late Transloadit client;
late String token;
final GlobalKey<NavigatorState> navigatorKey = GlobalKey<NavigatorState>();


void main() {
  runApp(MyApp());
}

class MyApp extends StatelessWidget {
  @override
  Widget build(BuildContext context) {
    return MaterialApp(
      title: 'Transloadit Recipes',
      theme: CustomTheme.lightTheme,
      debugShowCheckedModeBanner: false,
      initialRoute: '/',
      routes: {},
      navigatorKey: navigatorKey,
    );
  }
}
Note how we're using a ValueNotifier for both the results and isLoading flags. This enables us
to trigger a state update whenever the value of one of these variables changes. Later, we use this
in conjunction with ValueListenableBuilder.
You'll notice main.dart refers to a few files that we haven't yet created. Let's go over them
quickly:
-
defs/food.dartContains the blueprint of our Food objects:
class Food { Food({ required this.title, required this.subtitle, required this.description, required this.image, required this.ingredients, }); final String title; final String subtitle; final String description; final String image; final Map<dynamic, dynamic> ingredients; } -
defs/response.dartContains the blueprint of our Response objects:
class Response { Response({ required this.response, required this.name, }); final Map<dynamic, dynamic> response; final String name; } -
res/foods.dartHere, we define a list of all our food objects.
import '../defs/food.dart';

class Foods {
  static Food salad = Food(
    title: 'Watermarked Salad',
    subtitle: '/image/resize',
    image: 'assets/images/salad.jpg',
    description:
        'Fresh salad, delicately watermarked by our /image/resize Robot.',
    ingredients: {
      'use': ':original',
      'robot': '/image/resize',
      'result': true,
      'format': 'jpg',
      'watermark_url':
          'https://demos.transloadit.com/inputs/transloadit-padded.png',
      'watermark_size': '50%',
      'watermark_position': 'center',
      'imagemagick_stack': 'v3.0.0'
    },
  );

  static Food beef = Food(
    title: 'No Background Beef',
    subtitle: '/image/resize',
    image: 'assets/images/beef.png',
    description:
        'A tender cut of no background beef, optimized to be delicious.',
    ingredients: {
      'use': ':original',
      'robot': '/image/resize',
      'format': 'png',
      'alpha': 'Transparent',
      'type': 'TrueColor',
      'result': true,
      'transparent': '51,51,51',
      'imagemagick_stack': 'v3.0.0'
    },
  );

  static Food lamb = Food(
    title: 'Lamb Crop',
    subtitle: '/image/resize',
    image: 'assets/images/lamb.jpg',
    description:
        'Carefully marinated in a mixture of parameters and JSON, our lamb crop.',
    ingredients: {
      'use': ':original',
      'robot': '/image/resize',
      'result': true,
      'width': 1500,
      'height': 500,
      'resize_strategy': 'fillcrop',
      'imagemagick_stack': 'v3.0.0'
    },
  );
}
Creating our widgets
For our app, we'll need a variety of widgets. It's a little outside the scope of what we're covering
today, so we won't go over how to make them. Instead, you can grab all of the files you need to
place in your /widgets folder
here.
Setting up our screens
Now, we need to use the widgets on our screens to display some visual feedback to the user.
screens/home_page.dart
Let's create our home page.
import 'package:flutter/material.dart';

import '../utils/food_list.dart';
import '../utils/notifications.dart';
import '../utils/transloadit.dart';
import '../widgets/food_bottom_app_bar.dart';
import '../widgets/food_card.dart';
import '../defs/food.dart';
import '../res/colors.dart';

import '../main.dart';

class HomePage extends StatefulWidget {
  HomePage({Key? key, required this.title}) : super(key: key);
  final String title;
  @override
  _HomePageState createState() => _HomePageState();
}

class _HomePageState extends State<HomePage> {
  @override
  void initState() {
    super.initState();
  }

  updateFoodList(Food food) {
    setState(() {
      FoodList.updateFoodList(food);
    });
  }

  onCompleteUpload() {
    setState(() {
      isLoading.value = false;
    });
  }

  @override
  Widget build(BuildContext context) {
    return Scaffold(
      appBar: AppBar(
        title: Text(
          widget.title,
          style: Theme.of(context).textTheme.headline6,
        ),
        automaticallyImplyLeading: false,
      ),
      body: Center(
        child: ListView.builder(
          itemCount: foods.length,
          itemBuilder: (BuildContext context, int index) {
            return FoodCard(
              food: foods[index],
              onSelectedFood: updateFoodList,
            );
          },
        ),
      ),
      bottomNavigationBar: FoodBottomAppBar(
        recipeLength: FoodList.foodList.length,
        resultLength: results.value.length,
      ),
      floatingActionButtonLocation: FloatingActionButtonLocation.centerDocked,
      floatingActionButton: ValueListenableBuilder(
        valueListenable: isLoading,
        builder: (BuildContext context, bool value, Widget? child) {
          return value
              ? FloatingActionButton.extended(
                  onPressed: () {},
                  isExtended: true,
                  icon: Padding(
                    padding: const EdgeInsets.symmetric(vertical: 8.0),
                    child: CircularProgressIndicator(color: CustomColors.peach),
                  ),
                  label: Text('COOKING'),
                )
              : FloatingActionButton.extended(
                  onPressed: () {
                    setState(
                      () {
                        results.value.clear();
                        Transloadit.sendToTransloadit(
                          foodList: FoodList.foodList,
                          onCompleteUpload: onCompleteUpload,
                        );
                      },
                    );
                  },
                  isExtended: true,
                  label: Text('COOK'),
                  icon: Icon(Icons.microwave),
                );
        },
      ),
    );
  }
}
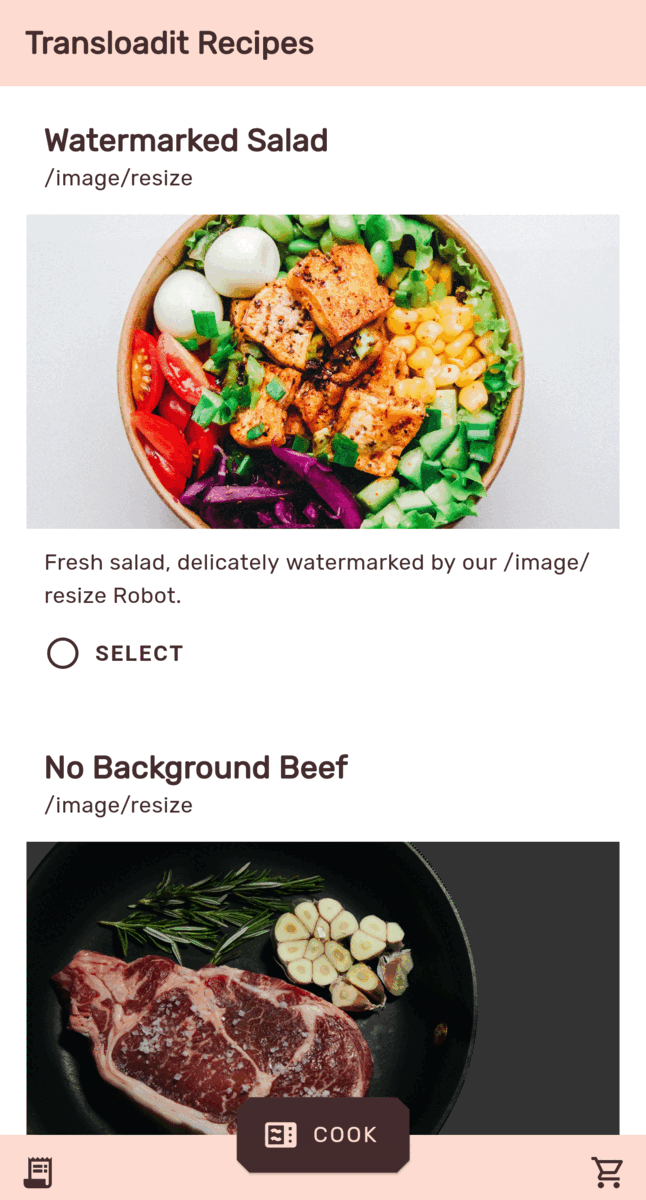
That should look something like this:
screens/receipt_page.dart
Next, let's put the receipt page together, although we won't be able to see it for a little while.
import 'package:flutter/material.dart';
import 'package:intl/intl.dart';
import '../defs/response.dart';
import '../widgets/receipt_card.dart';

import '../main.dart';

class ReceiptPage extends StatefulWidget {
  ReceiptPage({Key? key, required this.results}) : super(key: key);

  final List<Response> results;

  @override
  _ReceiptPageState createState() => _ReceiptPageState();
}

class _ReceiptPageState extends State<ReceiptPage> {
  @override
  void initState() {
    super.initState();
  }

  @override
  Widget build(BuildContext context) {
    return Scaffold(
      body: Center(
        child: Column(
          children: [
            Expanded(
              child: ListView.builder(
                itemCount: widget.results.length + 1,
                itemBuilder: (BuildContext context, int index) {
                  return index == 0
                      ? Column(
                          children: [ReceiptHeader(), ReceiptDivider()],
                        )
                      : Column(
                          children: [
                            ReceiptCard(
                              result: results.value[index - 1],
                            ),
                            ReceiptDivider()
                          ],
                        );
                },
              ),
            ),
          ],
        ),
      ),
      bottomNavigationBar: BottomAppBar(
        child: SizedBox(height: 50),
      ),
      floatingActionButtonLocation: FloatingActionButtonLocation.centerDocked,
      floatingActionButton: FloatingActionButton.extended(
        onPressed: () {
          setState(() {
            Navigator.of(context).pop();
          });
        },
        isExtended: true,
        label: Text('CLOSE'),
        icon: Icon(Icons.close),
      ),
    );
  }
}

class ReceiptHeader extends StatelessWidget {
  const ReceiptHeader({
    Key? key,
  }) : super(key: key);

  @override
  Widget build(BuildContext context) {
    return Padding(
      padding: const EdgeInsets.fromLTRB(0, 20, 0, 5),
      child: Column(
        children: [
          Text(
            'TRANSLOADIT RECIPES',
            style: Theme.of(context).textTheme.headline6,
          ),
          Text(
            DateFormat('dd/MM/yy').format(DateTime.now()),
            style: Theme.of(context).textTheme.bodyText1,
          ),
        ],
      ),
    );
  }
}

class ReceiptDivider extends StatelessWidget {
  const ReceiptDivider({
    Key? key,
  }) : super(key: key);

  @override
  Widget build(BuildContext context) {
    return Padding(
      padding: const EdgeInsets.symmetric(vertical: 8.0),
      child: Center(
        child: Text(
          '******************************',
          style: TextStyle(fontSize: 24, letterSpacing: 0.15),
        ),
      ),
    );
  }
}
And wrapping up, update main.dart with our new pages.
main.dart
class MyApp extends StatelessWidget {
  @override
  Widget build(BuildContext context) {
    return MaterialApp(
      title: 'Transloadit Recipes',
      theme: CustomTheme.lightTheme,
      debugShowCheckedModeBanner: false,
      initialRoute: '/',
      routes: {
        '/': (context) => HomePage(
              title: 'Transloadit Recipes',
            ),
        '/receipt': (context) => ReceiptPage(
              results: results.value,
            ),
      },
      navigatorKey: navigatorKey,
    );
  }
}
Finishing up
That's all we'll be doing for the time being! Congratulations for making it this far, and don't forget to read part two, where we'll round out this project by integrating our Flutter app with Firebase and Transloadit.