Build your own YouTube-like site with Uppy and Firebase

Have you ever wondered what it would be like to build your own YouTube-like site where you can upload videos and users can watch in different formats, while having discussions on the video page?
With the increasing worldwide demand for video content, and a growing concern about data ownership, building something like that might be a fun project to take on during the holidays 🎄 And a very IndieWeb project at that!
Now, I’m not saying that one person can build a true YouTube clone in just two hours. I’m just wondering: how far can we get in two hours? This is a bit of a lengthy one, so get comfortable! :)
Taking a look at our toolset
There are some powerful building blocks out at my disposal that will greatly help to cut down on time spent fleshing out the basic functionalities of YouTube. These tools are Node.js, Uppy, Transloadit, and Firebase. For our comments section, we’ll be using Disqus. This may not be ideal, but fine given the scope of this project.
Before we get started, a short introduction for those of us who might not be familiar with Uppy, Transloadit, or Firebase.
Uppy is a sleek, modular file uploader that integrates seamlessly with any website or app. It fetches files from a local disk, Google Drive, Dropbox, Instagram, remote URLs, cameras etc., and then uploads them to the final destination. It’s fast, easy to use and lets you worry about more important problems than building a file uploader.
One of the reasons we will be using Uppy is because of its seamless integration with:
Transloadit, a file uploading and processing service that developers can integrate with to handle file uploads, resize, crop and watermark images, make GIFs, transcode videos, extract thumbnails, generate audio wave-forms, process documents, and much more.
We’re using Firebase to host our project. In light of our IndieWeb reference and the recent monopoly concerns, it may be a bit ironic that we are building this on Google infra. it’s just that I hadn’t gotten my hands dirty on Firebase yet. Rest assured that you can just as well host this code on any other platform, such as Digital Ocean VPS, Heroku, or even your own Raspberry-Pi-powered iron!
Now that we’re familiar with the lego bricks on the table, let’s dive into using them to build our app.
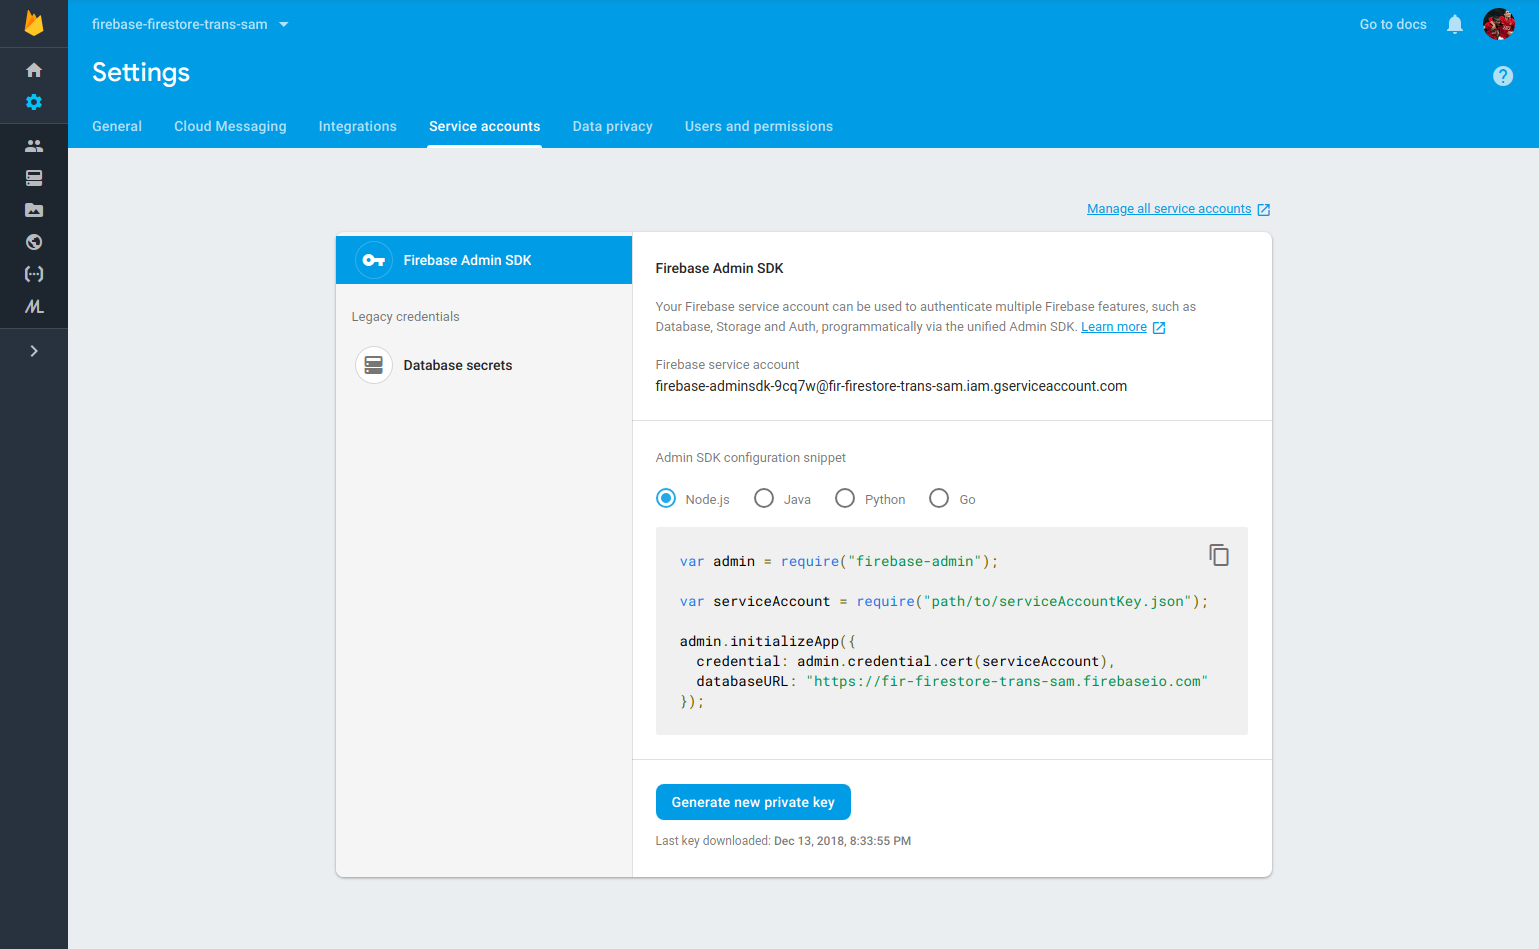
Setting up Firebase and grabbing credentials
First off, if we do not already have one, we need to sign up for a
Firebase account. After signing up, we need to create a new
project. Once you create a new project, navigate to settings → Service accounts, then click
the Generate new private key button to save a serviceaccount.json file.
We also need to grab Firebase storage details as we will use them to export the videos that Transloadit encoded. Navigate to storage, click on Get started, after which a modal will pop up to inform you about security rules. Click 'Got it', go to rules, and replace the existing rules with the one provided below, and click publish.
  service firebase.storage {
    match /b/{bucket}/o {
      match /{allPaths=**} {
        allow read, write;
      }
    }
  }
You should write down your folder URL from the files tab as Transloadit will need it. Another thing that Transloadit requires when creating storage credentials is your Project Id. To grab this, navigate to settings → General, and write down the Project Id.
The last thing we need to set up on Firebase is Firestore, since we will be using it as our database. Navigate to Database, then click on the Create Database button under the cloud Firestore. A modal will now pop up, asking you what mode you want to start with. For this tutorial, select Test Mode and click the enable button.
Setting up Transloadit
Setting up Transloadit is very straightforward. First, we need to sign up for an account. I’m choosing Login via GitHub. One click later, I have a working account with 2GB of free encoding credits.
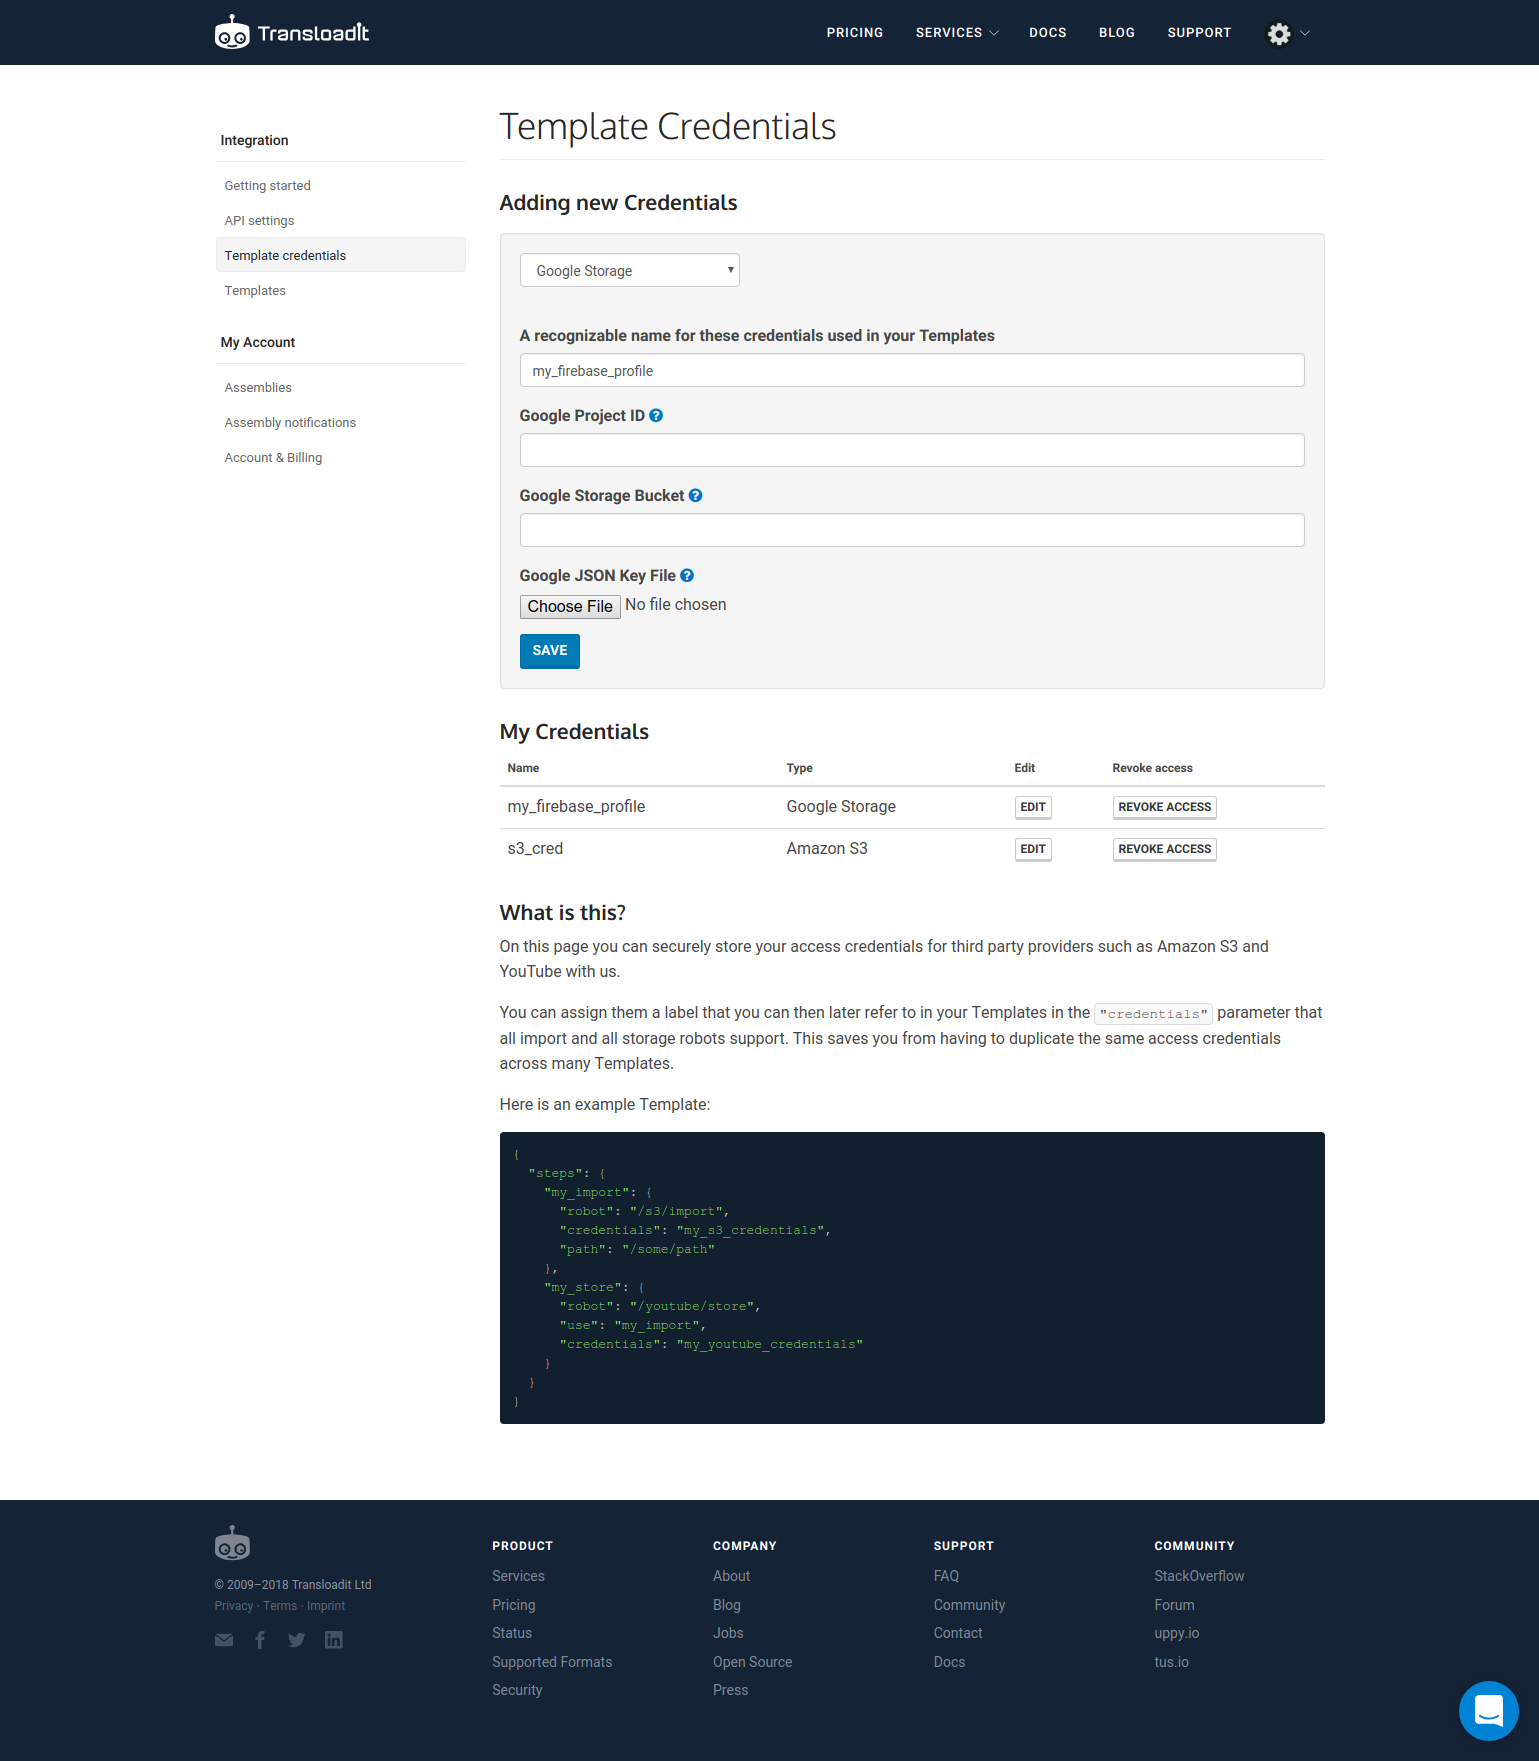
I then select Template Credentials by the sidebar. This should present you with a drop-down that
says choose a third party service. Since Firebase storage is basically the same as Google Cloud
storage, we'll select Google Storage from the drop-down. This then provides us with three more
inputs to fill out:
- our Project Id, where we provide a name for this key, which we wrote down during the Firebase Setup,
- our storage bucket, which is the folder URL we copied from the Firebase step, and
- our
serviceaccount.jsonfile, which we also downloaded during the Firebase step.
Next, we need to set up our Template which will hold some JSON data. To do this, I select
Templates in the sidebar. This should present you with a new page that has a
CREATE NEW TEMPLATE button. Click that button and paste the following JSON code into the
ASSEMBLY INSTRUCTIONS box:
{
  "steps": {
    ":original": {
      "robot": "/upload/handle"
    },
    "files_filtered": {
      "use": [":original"],
      "robot": "/file/filter",
      "result": true,
      "declines": [["${file.size}", ">", "20971520"]],
      "error_on_decline": true
    },
    "webm_720p_encoded": {
      "use": [":original"],
      "robot": "/video/encode",
      "result": true,
      "ffmpeg_stack": "{{stacks.ffmpeg.recommended_version}}",
      "preset": "webm",
      "width": 1280,
      "height": 720
    },
    "thumbnailed": {
      "use": [":original"],
      "robot": "/video/thumbs",
      "result": true,
      "ffmpeg_stack": "{{stacks.ffmpeg.recommended_version}}"
    },
    "browser1080_encoded": {
      "use": [":original"],
      "robot": "/video/encode",
      "result": true,
      "ffmpeg_stack": "{{stacks.ffmpeg.recommended_version}}",
      "height": 1080,
      "preset": "ipad-high",
      "width": 1920
    },
    "browser1440_encoded": {
      "use": [":original"],
      "robot": "/video/encode",
      "result": true,
      "ffmpeg_stack": "{{stacks.ffmpeg.recommended_version}}",
      "height": 1440,
      "preset": "ipad-high",
      "width": 2560
    },
    "exported": {
      "use": ["webm_720p_encoded", "browser1080_encoded", "browser1440_encoded", "thumbnailed"],
      "robot": "/google/store",
      "credentials": "firestore_cred"
    }
  },
  "allow_steps_override": false
}
After pasting the code above, give it any name of your choice and save the Template. Once this is done, Transloadit will generate a Template ID, which we’ll need to copy as well. I will go into more detail about this code snippet when we get to the point of using it.
Note: in the root of the JSON, we set
allow_steps_overrideto false. This is because we want to disallow any overriding of Steps, ensuring that a browser will never modify the behavior of our Template in any way. Adding sigature authentication would be even better.
Lastly, we will need to grab our Transloadit keys, which can be found by clicking the API Settings
in the sidebar. This will present us with a page to copy both our Auth and Secret Key.
Setting up the API
To get started with our API, we first need to install the Firebase CLI tool. We can do that by running:
npm install -g firebase-tools
Next, we need to log in with our Firebase user account:
firebase login
After logging in, it’s time to create our project:
# Create a directory which will house our API
mkdir youtube_clone_api
# Move into the API folder
cd youtube_clone_api
# Initiate Firebase
firebase init
Firebase will now ask which of its features you want to set up for this folder. We will select
functions. Next, you will be asked to either create or select a default Firebase project. Here,
select the project which we created in our Firebase setup step. Select JavaScript as your preferred
language, then decide if you want to use eslint or not. Finally, choose to install dependencies
now.
What we have now is a bare Firebase functions setup. Now it's time to add our own functions to it. For this, we will use Express alongside Firebase functions. These two play along very nicely.
# Move into the functions folder
cd functions
# Install required libraries
npm install --save body-parser cors express firebase-admin transloadit
Here, we have some libraries to use for creating our API. Now we can replace the content of
functions/index.js with:
const functions = require('firebase-functions')
const express = require('express')
const bodyParser = require('body-parser')
const app = express()
const cors = require('cors')
const fs = require('fs')
const { Transloadit } = require('transloadit')
const admin = require('firebase-admin')
const serviceAccount = require('PATH_TO_SERVICE_ACCOUNT.JSON')

admin.initializeApp({
  credential: admin.credential.cert(serviceAccount),
})
const settings = { timestampsInSnapshots: true }
const db = admin.firestore()
db.settings(settings)
const transloadit = new Transloadit({
  authKey: 'YOUR_TRANSLOADIT_AUTH_KEY',
  authSecret: 'YOUR_TRANSLOADIT_SECRET_KEY',
})

app.use(cors())
app.use(bodyParser.urlencoded({ extended: true }))
app.use(bodyParser.json())

app.get('/api/videos', function (req, res) {
  let videos = []
  db.collection('youtube_clone')
    .get()
    .then((snapshot) => {
      snapshot.forEach((doc) => {
        videos.push({ id: doc.outputPath, data: doc.data() })
      })
      res.json(videos)
    })
    .catch((err) => {
      console.log(err)
      res.json({ err })
    })
})

app.get('/api/video/:id', function (req, res) {
  db.collection('youtube_clone')
    .doc(req.params.id)
    .get()
    .then((snapshot) => {
      res.json({ id: snapshot.outputPath, data: snapshot.data() })
    })
    .catch((err) => {
      console.log(err)
      res.json({ err })
    })
})

app.post('/api/save-video/:assemblyId', function (req, res) {
  // https://api2.transloadit.com/assemblies
  transloadit.getAssembly(req.params.assemblyId, function (err, status) {
    if (err) {
      console.log(err)
      return res.json({ message: 'Could not fetch Assembly' })
    }

    const data = {
      title: req.body.title || req.body.name,
      license: req.body.license || 'IIC',
      caption: req.body.caption || 'No caption provided, enjoy the video',
      poster: status.results.thumbnailed[0].ssl_url,
      sources: [
        {
          type: status.results.webm_720p_encoded[0].mime,
          size: 720,
          src: status.results.webm_720p_encoded[0].ssl_url,
        },
        {
          type: status.results.browser1080_encoded[0].mime,
          size: 1080,
          src: status.results.browser1080_encoded[0].ssl_url,
        },
        {
          type: status.results.browser1440_encoded[0].mime,
          size: 1440,
          src: status.results.browser1440_encoded[0].ssl_url,
        },
      ],
    }

    const id = req.params.assemblyId + new Date().getTime()
    const docRef = db.collection('youtube_clone').doc()
    docRef.set(data)
    res.json({ message: 'Succesfully updated videos list', data, id })
  })
})

const api1 = functions.https.onRequest(app)
module.exports = {
  api1,
}
So, what’s happening exactly in the code block above?
We have a basic Express setup using popular Express libraries, such as Cors and Body-parser, to deal
with request handling. We set up Firebase-admin, Firestore, and Transloadit to manage encoding
and indexing media.
We defined the following three endpoints:
/api/videos- this endpoint fetches all the videos available in our Firestore collection. For this tutorial, our Firestore collection is namedyoutube_clone./api/video/:id- this endpoint will receive the details of a single video. It will be called when the video is ready to be displayed./api/save-video/:assemblyId- this endpoint saves our videos during encoding. Here, it might seem like magic is happening, so allow me to give you a breakdown:
When Transloadit encodes a video, it creates an Assembly, which is identified by its Assembly ID. In our approach, the videos will be sent directly to Transloadit via Uppy, after which we will send the Assembly ID back to the server. The server then uses the Assembly ID to fetch the results of the Assembly.
Once the results of the Assembly have been retrieved, each of our Assembly
Steps will have a key in the results key of our results. Let’s grab the information needed
from those keys and then save them into our database!
Now we are finally ready to call functions.https.onRequest, passing in our Express instance and
allowing Firebase functions to run this entire API. Isn’t that nice?
To serve the app locally, we need to move out of the functions folder and call firebase serve as
follows:
cd ../
firebase serve
Setting up the client app
For our client app, to get started easily, we will be using a Vue framework called Quasar. Install like so:
# Install the Vue CLI globally
npm install -g vue-cli
# Install the quasar CLI globally
npm install -g quasar-cli
After installing Quasar, let’s proceed to create our app by running:
quasar init youtube_clone_client
Then follow the prompt to set up the app properly.
Once the app has been set up, it's time to install the libraries we will be using in our app:
npm install --save @uppy/core @uppy/dashboard @uppy/dropbox @uppy/google-drive @uppy/instagram @uppy/transloadit @uppy/url @uppy/webcam plyr vue-disqus
In the code snippet above, we have installed the Uppy package alongside its plugins for Dropbox, Google Drive, Instagram, URL, Transloadit, and Webcam.
We have also installed plyr.io, which will play our videos and vue-disqus for implementing our
comments section.
Building the Layout Page Let’s dive into more code writing! Open up your
src/components/layout/layout.vue and replace the template aspect with:
<template>
  <q-layout view="lHh Lpr lFf">
    <q-layout-header>
      <q-toolbar color="primary" :inverted="$q.theme === 'ios'">
        <q-toolbar-title>
          <router-link :to="'/'" style="color: white; text-decoration:none;">
            2hr YouTube “Clone”
          </router-link>
          <div slot="subtitle">
            Powered by <a href="">Transloadit</a>, <a href="https://uppy.io">Uppy</a> and Firebase
          </div>
          <q-btn
            color="standard"
            @click="openUppyModal"
            label="Upload Videos"
            style="float:right;"
          />
        </q-toolbar-title>
      </q-toolbar>
    </q-layout-header>
    <q-page-container>
      <router-view />
    </q-page-container>
  </q-layout>
</template>
So, what has changed in here? In the new code snippet, we have removed the default drawer navigation
that comes with Quasar, and edited our header to have a button by the right-hand side for uploading
videos. Note that the q-btn element has a click directive that calls the openUppyModal
function. Let’s find out in the next code block what this function does and where it is defined?.
Staying in the same src/components/layout/layout.vue file, let’s replace the script aspect with:
import axios from 'axios'
import Uppy from '@uppy/core'
import Transloadit from '@uppy/transloadit'
import Dashboard from '@uppy/dashboard'
import Webcam from '@uppy/webcam'
import Instagram from '@uppy/instagram'
import Dropbox from '@uppy/dropbox'
import GoogleDrive from '@uppy/google-drive'
import Url from '@uppy/url'

require('@uppy/core/css/style.css')
require('@uppy/dashboard/css/style.css')
require('@uppy/webcam/css/style.css')
require('@uppy/url/css/style.css')

export default {
  name: 'MyLayout',
  data: function data() {
    return {
      opened: false,
      uppy: '',
      results: {},
    }
  },
  methods: {
    openUppyModal: function (event) {
      this.uppy.getPlugin('Dashboard').openModal()
    },
    closeUppyModal: function (event) {
      this.uppy.getPlugin('Dashboard').closeModal()
    },
  },
  mounted: function mounted() {
    axios.defaults.headers.common = {
      'Content-Type': 'application/json',
      Accept: 'application/json',
    }
    this.uppy = Uppy({
      id: 'uppy',
      autoProceed: false,
      allowMultipleUploads: true,
      debug: false,
      restrictions: {
        maxFileSize: 20971520,
        maxNumberOfFiles: 20,
        minNumberOfFiles: 1,
        allowedFileTypes: ['video/*'],
      },
    })
      .use(Dashboard, {
        // inline: true,
        // target: this.$refs['select-files'],
        disablePageScrollWhenModalOpen: false,
        closeModalOnClickOutside: true,
        note: 'Maximum size for this demo is 20MB. Please Edit the description of each video before uploading',
        metaFields: [
          { id: 'title', name: 'Title', placeholder: 'Video Title' },
          { id: 'license', name: 'License', placeholder: 'Specify license' },
          { id: 'caption', name: 'Caption', placeholder: 'Describe what the video is about' },
        ],
      })
      .use(Webcam, { target: Dashboard })
      .use(Instagram, {
        target: Dashboard,
        serverUrl: 'https://api2.transloadit.com/companion',
        serverPattern: /\.transloadit\.com$/,
      })
      .use(GoogleDrive, {
        target: Dashboard,
        serverUrl: 'https://api2.transloadit.com/companion',
        serverPattern: /\.transloadit\.com$/,
      })
      .use(Dropbox, {
        target: Dashboard,
        serverUrl: 'https://api2.transloadit.com/companion',
        serverPattern: /\.transloadit\.com$/,
      })
      .use(Url, {
        target: Dashboard,
        serverUrl: 'https://api2.transloadit.com/companion',
        serverPattern: /\.transloadit\.com$/,
      })
      .use(Transloadit, {
        params: {
          auth: {
            key: 'YOUR_TRANSLOADIT_AUTH_KEY',
          },
          // it’s more secure to use a template_id and enable
          // Signature Authentication
          template_id: 'YOUR_TRANSLOADIT_TEMPLATE_ID',
        },
        waitForEncoding: true,
      })
    this.uppy.on('complete', (result) => {
      this.$q.loading.show({
        message: 'Saving encoded videos to firebase',
        messageColor: 'black',
        spinnerColor: 'white',
      })
      result.successful.forEach((element, index) => {
        axios
          .post(`${window.base_url}/api/save-video/${element.transloadit.assembly}`, element.meta)
          .then((response) => {
            // this.vidoes = response.data.data
            if (index + 1 == result.successful.length) {
              this.$q.loading.hide()
              this.$q.notify({
                color: 'positive',
                position: 'top',
                message: 'All files uploaded. videos ready. Please visit the home page',
                icon: 'report_problem',
              })
              this.uppy.getPlugin('Dashboard').closeModal()
            }
          })
          .catch(() => {
            this.$q.loading.hide()
            this.$q.notify({
              color: 'negative',
              position: 'top',
              message: 'Loading failed',
              icon: 'report_problem',
            })
          })
      })
    })
  },
}
This is where the bulk of the work is going on.
First, we imported the Uppy core library and all of its plugins which we installed previously. Next, we imported their respective styles.
In the methods section, we defined the open and close methods of the Uppy Dashboard plugin.
In the mounted section, we defined an instance of Uppy, passing in some options. One of the options
we passed is called restrictions, which comprises:
maxFileSize- The maximum size of a file that can be accepted. Here, it is 20MBmaxNumberOfFiles- The maximum number of files that can be uploaded in one go, which we set at 20.minNumberOfFiles- The minimum number of files that can be uploaded in one go, which we set to 1.allowedFileTypes- The files we want to allow for uploading. In our case, since we are building a video site, it is set to video.
We then called the .use function, which is used to notify Uppy of the plugins we want to use —
passing in, for instance, the Dashboard plugin. We also passed in some options such as note, which
informs users of any special uploading requirements, and the metaFields option, an array of fields
that we would like to collect alongside every uploaded file. In our case, we want a title, the
license and the description of the file.
Going further, we made a couple of calls to the use function, passing in our plugins, targeting
them to the Dashboard and passing in the serverUrl to which they should be uploaded. Let’s take a
further look at the use call to the Transloadit Uppy plugin.
If you are used to Transloadit, the above should look familiar. For those new to Transloadit, these options passed to the Transloadit plugin are called Assembly Instructions: a simple JSON string holds a recipe for what Transloadit should do with your files.
Inspecting the Assembly Instructions, we supplied an auth param, passing in our
Transloadit auth key. Next, we passed in the template_id that we created while setting up Transloadit.
In our saved Template, we defined a few steps for our files to
go through. Here, we have asked Transloadit to reject any file above 20MB in size, to encode our
videos into three different sizes: 720p, 1080p and 1440p, and to give us screenshots of the video,
which we will use as poster/banner images later on in the app.
Note that you can define as many Steps as you want for your videos. For example, you can encode to 360p, 560p, and even 4k formats, or create an animated GIF for previewing. If you want to be the next YouTube for audio files, you can consider generating waveforms as previews.
We then proceeded by asking Uppy to wait for encoding to be done before notifying us the upload
process is completed.
And lastly, we added a listener to know when a file upload process has completed. Once completed, we display a loader while we send the new Assembly ID to the API we created earlier, so it can save our new details in the database.
By default, the call to
this.$q.notifywould cause errors, as the notify plugin isn’t loaded. To solve this, we have to edit thequasar.conf.jsfile at the root of our folder, then add it to the framework plugins.
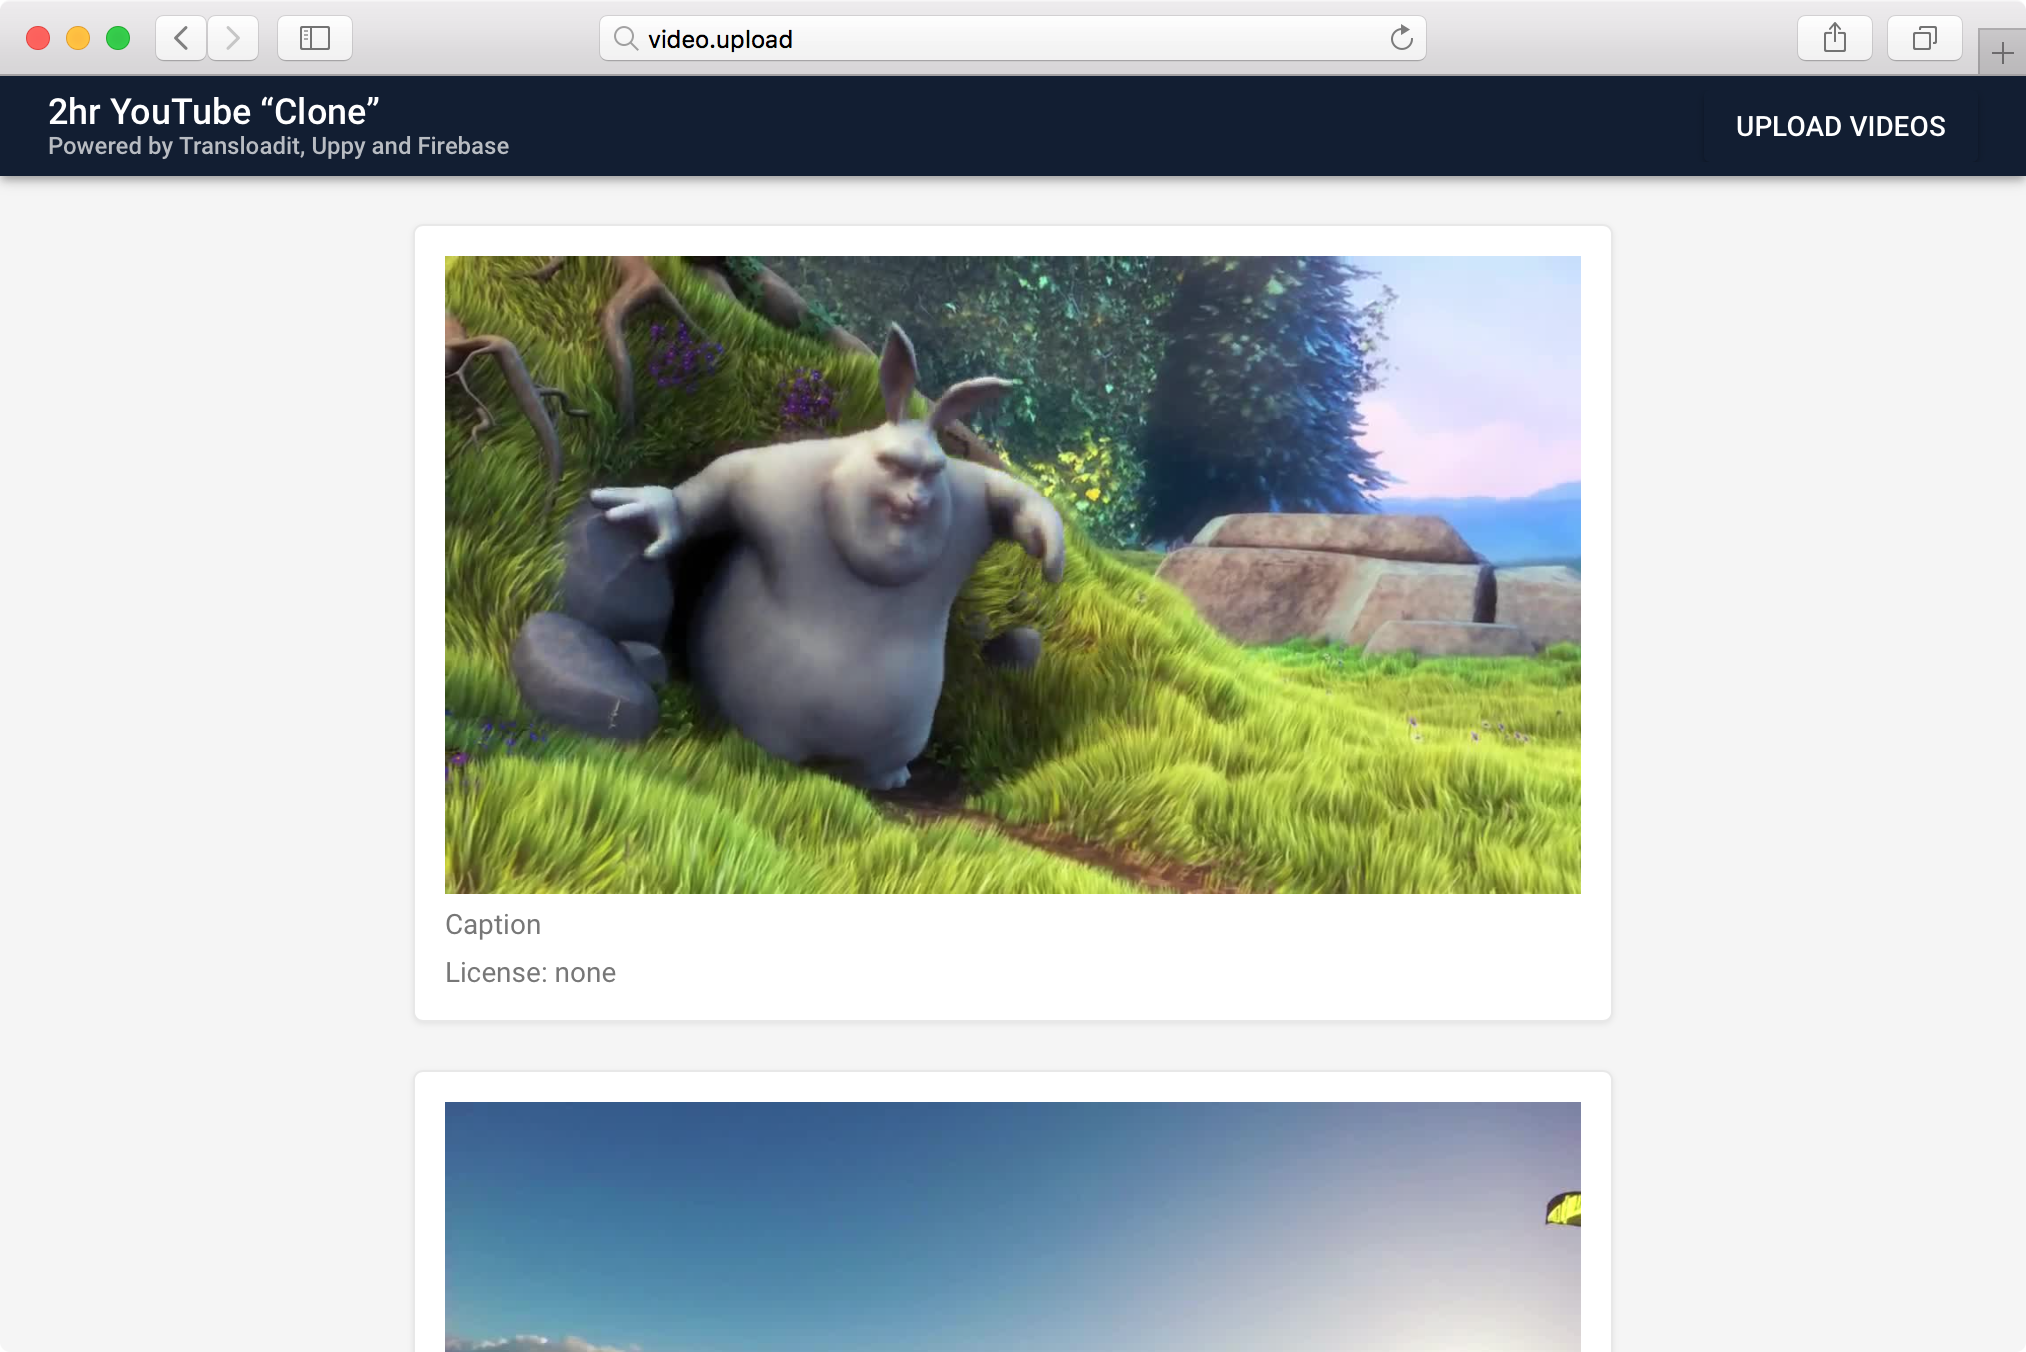
Building the homepage We need a page that lists all of our videos, so we can select which one we
want to view. Let’s replace the content of src/components/pages/index.vue with:
<template>
  <q-page class="flex">
    <div class="q-container">
      <q-card v-for="vid in vidoes" v-bind:key="vid.id">
        <router-link :to="'/video/'+vid.id" class="video-link">
          <q-card-media>
            <img :src="vid.data.poster" />
          </q-card-media>
          <q-card-main>
            <q-card-title>{{vid.data.title}}</q-card-title>
            <p class="text-faded">{{vid.data.caption}}</p>
            <p class="text-faded">License: {{vid.data.license}}</p>
          </q-card-main>
        </router-link>
      </q-card>
      <h3 v-if="!vidoes.length">We have no videos in store currently. Please check later 👌</h3>
    </div>
  </q-page>
</template>
<script>
  import axios from 'axios'
  export default {
    data: () => ({
      vidoes: [],
    }),
    mounted: function mounted() {
      this.$q.loading.show({
        message: 'Loading available Videos',
        messageColor: 'black',
        spinnerColor: 'white',
      })
      axios
        .get(`${window.base_url}/api/videos`)
        .then((response) => {
          this.vidoes = response.data.data
          this.$q.loading.hide()
        })
        .catch(() => {
          this.$q.notify({
            color: 'negative',
            position: 'top',
            message: 'Loading failed',
            icon: 'report_problem',
          })
          this.$q.loading.hide()
        })
    },
  }
</script>
What’s happening here? First, we display a pre-loader while we are fetching all videos, then we make an AJAX call to our API via Axios to fetch us the videos. Once we get the videos, we then display them in a loop, displaying the poster, caption, and description.
Here, note that the router-link call attempts to move to a route defined as /video/:id,
while no such route exists yet.
Some components which we have used such as QCard, QCardTitle, QCardMain, QCardMedia are not
made available by Quasar by default. To make them available, we have to edit the quasar.conf.js
file at the root of our folder, then add it to the framework component as follows:
framework: {
  components: [
    'QLayout',
    'QLayoutHeader',
    'QLayoutDrawer',
    'QPageContainer',
    'QPage',
    'QToolbar',
    'QToolbarTitle',
    'QBtn',
    'QIcon',
    'QList',
    'QListHeader',
    'QItem',
    'QItemMain',
    'QItemSide',
    'QCard',
    'QCardTitle',
    'QCardMain',
    'QCardMedia',
  ]
  // …
}
Defining the video routes Let’s open up our src/router/routes.js and replace the content with:
window.base_url = 'https://localhost:5000/fir-firestore-trans-sam/us-central1/api1'
const routes = [
  {
    path: '/',
    component: () => import('layouts/MyLayout.vue'),
    children: [
      { path: '', component: () => import('pages/Index.vue') },
      { path: '/video/:id', component: () => import('pages/single.vue') },
    ],
  },
]
// Always leave this as last one
if (process.env.MODE !== 'ssr') {
  routes.push({
    path: '*',
    component: () => import('pages/Error404.vue'),
  })
}
export default routes
Looking at the code block above, note the two changes were made to the routes file, which are:
- the declaration of a
window.base_url. If you notice, there has been a call to thebase_urlwith our axios calls. In Quasar, themain.js/app.jsfile is generated by default, which can lead to changes being overwritten. One place where we can declare global variables happens to be the routes file. - adding a new child to the initial part, which accepts the
video/:idroute and also imports the single component that we have yet to create.
Creating the single component In the routes above, an import to the pages/single.vue file was
made. Now it’s time to create that file. Create a new file called single.vue in your
src/components/pages folder and add:
<template>
  <q-page>
    <div style="margin: 30px auto; width: 700px;">
      <video
        v-if="video.id"
        id="my-player"
        ref="my-player"
        controls
        crossorigin
        playsinline
        data-plyr-config='{ "title": "This is an example video", "volume": 1, "debug": true }'
        :poster="video.data.poster"
      >
        <source
          v-for="(src, index) in video.data.sources"
          v-bind:key="index"
          :src="src.src"
          :type="src.type"
          :size="src.size"
        />
      </video>
      <h3 v-if="!video.id">Cannot fetch video</h3>
    </div>
    <div class="comments">
      <vue-disqus shortname="youclone" url=""></vue-disqus>
    </div>
  </q-page>
</template>
<script>
  import Plyr from 'plyr'
  import axios from 'axios'
  import 'plyr/dist/plyr.css'
  export default {
    data: function data() {
      return {
        player: '',
        video: {},
      }
    },
    components: {},
    mounted: function mounted() {
      this.$q.loading.show({
        message: 'Preparing all video formats for your graceful view',
        messageColor: 'black',
        spinnerColor: 'white',
      })
      axios
        .get(`${window.base_url}/api/video/${this.$route.params.id}`)
        .then((response) => {
          this.video = response.data.data
          setTimeout(() => {
            this.player = new Plyr(this.$refs['my-player'])
            this.$q.loading.hide()
          }, 50)
        })
        .catch(() => {
          this.$q.loading.hide()
          this.$q.notify({
            color: 'negative',
            position: 'top',
            message: 'Loading failed',
            icon: 'report_problem',
          })
        })
    },
  }
</script>
<style>
  .plyr--video {
    max-height: 100%;
    width: 100%;
    margin: 2em;
  }
  .plyr__video-wrapper {
    background: #000;
    border-radius: inherit;
    overflow: hidden;
    position: relative;
    z-index: 0;
    object-fit: fill;
  }
</style>
In the code block above, we have imported plyr.io for displaying our video, and it was done in the
following way:
- Creating a Video HTML tag in the template, setting its poster to our thumbnail image.
- Looping over our different video types, using them as sources. We also added a size attribute, so
plyr.iocan display a quality switcher. If the size attribute is not added, the quality switcher would not show up. - In the script section, we use
axiosto fetch our video using its id. - Once the video is fetched, we wait for a 50ms period before initializing
plyr.io, so we are sure everything has rendered successfully.
Note
We made a call to vue-disqus in the Template. The thing is,
vue-disqus is not available to us as it requires an app-wide integration, not just on a
component level. In Quasar, your main.js is automatically generated and any changes you make
would be overwritten. So how do we make it available? By declaring it as a Quasar plugin.
Adding a plugin for Vue-Disqus
Adding a plugin to Quasar is quite straightforward. Run the following in the terminal:
quasar new plugin disqus
Note
the name disqus here should be the name of your plugin. You can give it any name
you want.
This command creates a new file under src/plugins, called disqus.js . Replace the content of the
file with:
// import something here
import VueDisqus from 'vue-disqus'
// leave the export, even if you don't use it
export default ({ Vue }) => {
  // something to do
  Vue.use(VueDisqus)
}
We have now imported the vue-disqus plugin and asked the Vue instance to use it as a plugin.
At this point, Quasar would not load this plugin until we specify it in the way we did for the
notify plugin. To do that, we have to edit the quasar.conf.js file at the root of our folder,
then add it to the framework plugins, so it looks like this:
framework: {
  components: // …,
  directives: // …,
  // Quasar plugins
  plugins: [
    'Notify',
    'Loading',
  ]
}
Adding styles to our app Our app could still do a bit better in terms of styling. To add some
more slickness to our app, let’s replace the content of src/css/app.styl with:
body {
  background-color: #f5f5f5;
}

p {
  margin: 0 0 8px;
}

a {
  text-decoration: none;
}

.video-link {
  display: block;
}

.q-container {
  max-width: 1040px;
  margin: 0 auto;
  padding: 0 20px;
  overflow: hidden;
}

.q-container:empty {
  display: none;
}

.q-container h3 {
  font-size: 25px;
}

.q-card {
  background-color: #fff;
  padding: 15px 15px 8px;
  margin-top: 1.5em;
  margin-bottom: 1.5em;
  box-shadow: 0 1px 3px rgba(0, 0, 0, 0.08);
  border: 1px solid #e8e8e8;
  max-width: 600px;
  border-radius: 5px;
}

.q-card-main.q-card-container {
  padding: 0;
}

.q-card-primary.q-card-container {
  margin-top: 7px;
  padding: 0;
}

.q-card-title {
  font-size: 16px;
  font-weight: 500;
}

.q-toolbar-subtitle a {
  // text-decoration: underline;
  color: #fff;
}

.q-toolbar-subtitle a:hover {
  text-decoration: underline;
}

// Uppy-specific styles

.uppy-transloadit-youtube .uppy-Dashboard-note {
  max-width: 430px !important;
  font-size: 14px !important;
  line-height: 1.5 !important;
  margin: auto !important;
}

.uppy-transloadit-youtube .uppy-size--md {
  font-size: 14px;
}

.uppy-transloadit-youtube .uppy-Dashboard--modal .uppy-Dashboard-overlay {
  background-color: rgba(0, 0, 0, 0.75) !important;
  z-index: 2005 !important;
}

.uppy-transloadit-youtube .uppy-Dashboard--modal .uppy-Dashboard-inner {
  z-index: 2010 !important;
}

.uppy-Dashboard-isFixed .q-layout-header {
  z-index: 1000;
}
What our app looks like
Here is a video demonstrating what our little app looks like at this point.
Here’s the GitHub Repo and here is the actual app.
Conclusion
Hopefully, I have been able to show you how surprisingly easy it is to get your own video site rolling in just a couple of hours. Can you build a better iteration on top of this over the christmas break? 😄
If you have any further questions, please feel free to reach out to us. Happy Holidays!