Using postman to interface with the Transloadit API

Postman is a service all about APIs, whether you're looking to create one or use one. We'll be looking at the latter use-case today, to see how you can set Postman up to use the Transloadit API to return a list of all your recent Assemblies, and also how we can create new Assemblies. This is particularly useful if you're directly using the Transloadit REST API, rather than an SDK, allowing you to debug your requests much quicker than it would otherwise take you.
To do this, we'll also take a quick refresher on using Signature Authentication with Transloadit.

Creating an Assembly
Inside of a workspace, click "New" in the top left, then choose "HTTP Request". After this, change the request type from "GET" to "POST".
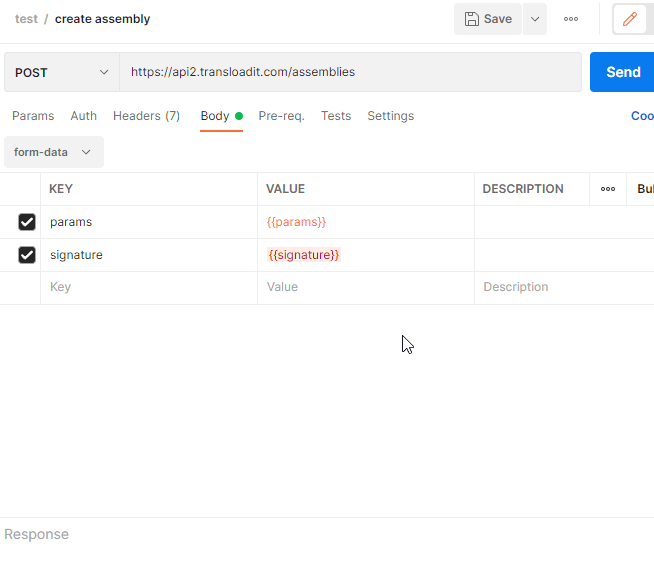
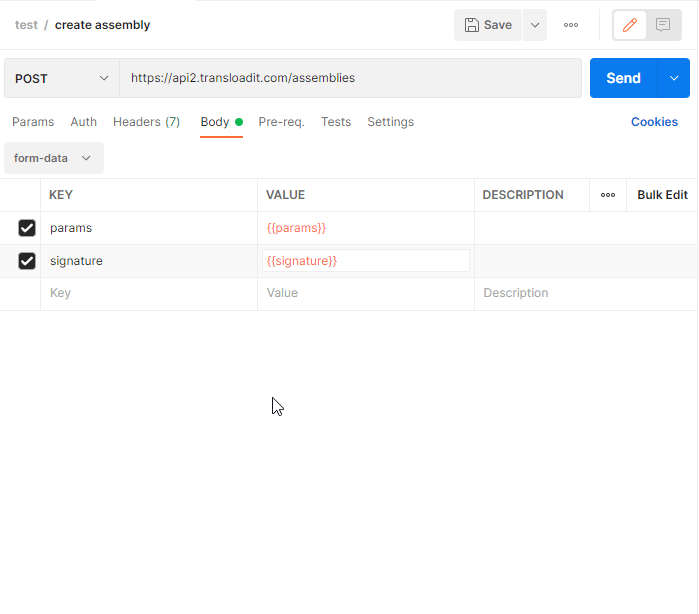
Now, you can set the request URL to https://api2.transloadit.com/assemblies.
Inside of the "Body" tab, you'll need to set the type to ,form-data and add two keys:
params and signature. For the values, set them to
{{params}} and {{signature} respectively.
You might notice now that the values are highlighted, this is because Postman is expecting a variable, but we haven't declared any. Simply double-click the value and click "Set as variable", and it should no longer be highlighted. You can set the value to anything, as we'll be changing it programatically later.
Signature Authentication
After you've set up your request body, we can move to the "Pre-request Script" tab. This allows you to run JavaScript before your request, in order to modify your request. We'll be using this to generate a signature with our request.
Here's the script we'll be using.
const utcDateString = (ms) => {
  return new Date(ms)
    .toISOString()
    .replace(/-/g, '/')
    .replace(/T/, ' ')
    .replace(/\.\d+$/, '+00:00')
}

const expires = utcDateString(+new Date() + 2 * 60 * 60 * 1000)
const authKey = 'YOUR_AUTH_KEY'
const authSecret = 'YOUR_AUTH_SECRET'

const params = JSON.stringify({
  auth: {
    key: authKey,
    expires,
  },
  template_id: 'YOUR_TEMPLATE_ID',
})

const secret = CryptoJS.enc.Utf8.parse(authSecret)
const paramsEncoded = CryptoJS.enc.Utf8.parse(params)
const hmac = CryptoJS.HmacSHA1(paramsEncoded, secret)
const signature = CryptoJS.enc.Hex.stringify(hmac)

pm.environment.set('params', params)
pm.environment.set('signature', signature)
Replace the Template ID with one of your choice. If you're looking to upload a file with your
request, head back over to the body and add a files key, and change the type to "file". Then
simply choose a file from your system to upload with your assembly.
If you now click "Send", you should receive a response at the bottom of your workspace. If the "ok" value is "ASSEMBLY_EXECUTING", then you should be able to see the Assembly running from your Transloadit console.
Getting recent Assemblies
The process for getting recent assemblies is very similar.
Create a new HTTP request, this time though keep the request type to "GET".
The request URL is
https://api2.transloadit.com/assemblies?signature={{signature}}¶ms={{params}}, as we'll be
sending our params and signature as URL encoded parameters, rather than as part of the body.
Now, add the same script as from before to the "Pre-request script" tab, but add the following line, so the bottom of the script looks like so.
const uriEncoded = encodeURIComponent(params)

pm.environment.set('params', uriEncoded)
pm.environment.set('signature', signature)
Wrapping things up
That's all for our brief glance at using Postman with the Transloadit API. I hope that this has helped you get a better grasp of how our API works. If not, feel free to reach out to us on support and we can give you a guided tour of the API 📭