
What is transcoding?

Transcoding converts an existing media file from one codec, format, bitrate, or resolution into another. It is the step that turns an unpredictable upload into media that plays reliably on the devices, browsers, and network conditions your product supports.
This guide explains when transcoding is necessary, how it differs from related operations, and how to build a managed transcoding workflow without operating FFmpeg infrastructure yourself.
What is transcoding?
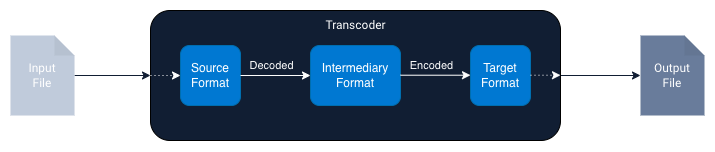
Transcoding decodes an existing media stream and encodes it again with a different output configuration. The output can change its container, codec, resolution, bitrate, frame rate, audio layout, or several of these properties at once.
The diagram below shows the common path: compressed input is decoded to an intermediate representation such as PCM for audio or YUV for video, then encoded into the target format. Repeated lossy transcoding can introduce generation loss, so keep the highest-quality source and derive delivery formats from it rather than repeatedly converting previous outputs.
When do you need transcoding?
Typical transcoding jobs solve one or more of these problems:
- Playback compatibility: normalize uploads to codecs and containers supported by your target browsers, mobile apps, televisions, or editing tools.
- Adaptive streaming: create multiple renditions for HLS or DASH so a player can switch quality as bandwidth changes.
- File-size reduction: lower resolution or bitrate, or move to a more efficient codec, to reduce storage and delivery costs.
- Consistent product output: normalize frame rate, dimensions, loudness, channels, and metadata even when users upload files from many different devices.
- Derivative creation: produce previews, mobile renditions, audio-only outputs, or archival masters from one source.
Transcoding vs. encoding vs. transmuxing
These terms describe related but different operations:
| Operation | What changes | Decode and re-encode? | Example |
|---|---|---|---|
| Encoding | Raw or uncompressed media becomes compressed media | Yes | Camera frames to H.264 |
| Transcoding | Existing compressed media gets a new delivery configuration | Yes | HEVC 4K to H.264 1080p |
| Transmuxing | The container changes while encoded streams stay intact | No | H.264 from MOV to MP4 |
Transmuxing is faster and avoids generation loss, but it only works when the existing streams are already suitable for the destination. If the codec, resolution, bitrate, or another stream property must change, you need transcoding.
How can I transcode videos with Transloadit?
You can build an in-house transcoding pipeline with FFmpeg, but production systems also need upload handling, queues, retries, scaling, monitoring, storage integration, and delivery. Transloadit provides these parts as one managed file-processing API.
The Video Encode Robot applies presets or custom FFmpeg parameters, while the Video Adaptive Robot creates adaptive HLS or MPEG-DASH packages. Audio-only workflows can use the Audio Encode Robot.
How about we take a look at an example? The Template below shows how to make any uploaded video compatible for browsers, using Uppy.
<!-- This pulls Uppy from our CDN -->
<!-- For smaller self-hosted bundles, install Uppy and plugins manually: -->
<!-- npm i --save @uppy/core @uppy/dashboard @uppy/remote-sources @uppy/transloadit ... -->
<link
  href="https://releases.transloadit.com/uppy/v3.10.0/uppy.min.css"
  rel="stylesheet"
/>
<button id="browse">Select Files</button>
<script type="module">
  import {
    Uppy,
    Dashboard,
    ImageEditor,
    RemoteSources,
    Transloadit,
  } from 'https://releases.transloadit.com/uppy/v3.10.0/uppy.min.mjs'
  const uppy = new Uppy()
    .use(Transloadit, {
      waitForEncoding: true,
      alwaysRunAssembly: true,
      assemblyOptions: {
        params: {
          // It's often better store encoding instructions in your account
          // and use a `template_id` instead of adding these steps inline
          steps: {
            ':original': {
              robot: '/upload/handle',
            },
            browser720_webm_encoded: {
              use: ':original',
              robot: '/video/encode',
              result: true,
              ffmpeg_stack: 'v7',
              height: 720,
              preset: 'webm',
              turbo: false,
              width: 1280,
            },
            browser720_h264_encoded: {
              use: ':original',
              robot: '/video/encode',
              result: true,
              ffmpeg_stack: 'v7',
              height: 720,
              preset: 'ipad-high',
              turbo: false,
              width: 1280,
            },
            thumbed: {
              use: 'browser720_h264_encoded',
              robot: '/video/thumbs',
              result: true,
              count: 1,
              ffmpeg_stack: 'v7',
              format: 'jpg',
              height: 720,
              resize_strategy: 'fit',
              width: 1280,
            },
            exported: {
              use: ['browser720_webm_encoded', 'browser720_h264_encoded', 'thumbed', ':original'],
              robot: '/s3/store',
              credentials: 'demo_s3_credentials',
              url_prefix: 'https://demos.transloadit.com/',
            },
          },
        },
      },
    })
    .use(Dashboard, { trigger: '#browse' })
    .use(ImageEditor, { target: Dashboard })
    .use(RemoteSources, {
      companionUrl: 'https://api2.transloadit.com/companion',
    })
    .on('complete', ({ transloadit }) => {
      // Due to `waitForEncoding:true` this is fired after encoding is done.
      // Alternatively, set `waitForEncoding` to `false` and provide a `notify_url`
      console.log(transloadit) // Array of Assembly Statuses
      for (const assembly of transloadit) {
        console.log(assembly.results) // Array of all encoding results
      }
    })
    .on('error', (error) => {
      console.error(error)
    })
</script>
You can also try related workflows without writing integration code:


Build your first transcoding workflow
Start with the browser-compatible demo above, then adjust its preset for the output your product needs. You can run the resulting Template through the API, connect it to Uppy for browser uploads, or add an export Robot to deliver results directly to your storage provider.
If you need help choosing codecs, renditions, or streaming formats, talk to our team.