Re-Loadit: simplify uploads with /upload/handle Robot

This blog post is the third part of the series that we're calling Re-loadit. In these blog posts, we are covering a number of Transloadit's features that haven't yet received a proper introduction to our users.
Similar to other Robot introductions, we will give you some examples, explain the key functionality of the Robot and offer some tips on how to get started. We hope you'll enjoy learning more about leveraging Transloadit's breadth of features.
The /upload/handle Robot
One of the many ways to provide Transloadit with a file to transcode is the /upload/handle Robot. This Robot handles both single and multiple file uploads without any issues. It is by far the simplest method of uploading files to Transloadit, and can be used alongside your HTML forms.
You aren't required to define multiple upload points for multiple file uploads, as the /upload/handle Robot can process multiple uploads in one instance, thanks to our node-formidable library. The files form different fields in a multipart upload. This Robot can also effortlessly handle resumable file uploads by using tus, our very own open source protocol for resumable uploads, which is on its way to become the industry standard.
Why have /upload/handle as a Robot?
Well, why do something yourself when a Robot could be doing it in a fraction of the time! 😎
Joking aside, while the /upload/handle Robot has only been part of the Transloadit Robot family since May of last year, its core functionality has been an integral part of our service since the very beginning. As it turned out, however, our customers also really needed a means to define metadata (and other options) for uploaded files — and not just for transcoding results.
And that's exactly why we developed a Robot for handling file uploads. Now, if you wanted
to know whether uploaded files had transparent areas, you just had to set
output_meta : {has_transparency: true} on the /upload/handle
Robot, and meta.has_transparency would automatically be set on the results.
What can it do?
From the name, we can already guess its functionality. The /upload/handle Robot will upload all the files you need to Transloadit, so they are available for encoding Steps. As an example of how it works, I will show you how to import random files and verify from Transloadit's dashboard that they were succesfully uploaded.
We will upload files to Transloadit via an Assembly and then log in to our Transloadit dashboard to verify that the files have arrived safely.
Creating the Assembly
These are the Assembly Instructions I used:
{
  "steps": {
    ":original": {
      "robot": "/upload/handle"
    }
  }
}
So, what is going on in the code above? We have defined Assembly Instruction that ask Transloadit to handle the uploaded files. Since we have not added any other Steps, this means that Transloadit will not do any further processing to those files.
To try out our newly created Template, we just have to run the following Node.js code, taking the webpage we want as an argument. Feel free to try it out yourself.
const { Transloadit } = require('transloadit')

const transloadit = new Transloadit({
  authKey: process.env.TRANSLOADIT_AUTH_KEY,
  authSecret: process.env.TRANSLOADIT_SECRET_KEY,
})

const options = {
  params: {
    steps: {
      ':original': {
        robot: '/upload/handle',
      },
    },
  },
}

transloadit.addFile('file_1', 'PATH_TO_LOCAL_VIDEO_FILE')
transloadit.createAssembly(options, (err, result) => {
  if (err) {
    throw err
  }
  console.log({ result })
})
After testing the code, log in to your dashboard, click on Assemblies in the sidebar, then click on the first Assembly you see, and you should get a result like this:
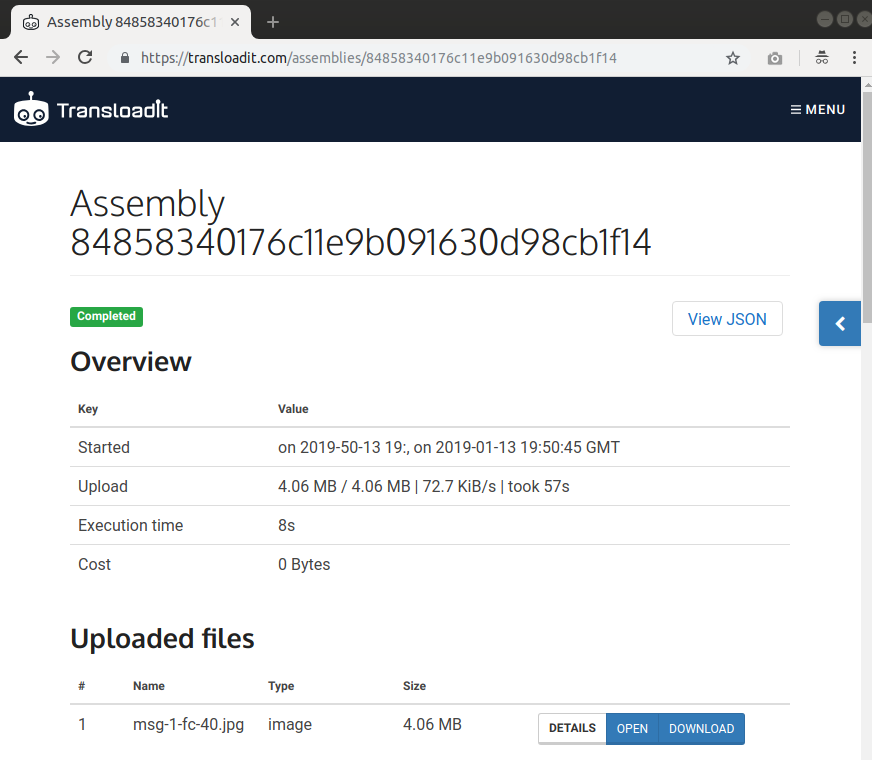
Note that your file will be listed in the uploaded files section.
Testing with multiple files
While we can test multiple file uploads exactly the way we did for the single file, I think it will be better if we use a different example that shows how to upload multiple files in a more realistic scenario. In this example, we will be burning a subtitle into a video file using the /upload/handle Robot and the /video/subtitle Robot. Take a look at the Assembly Instruction:
{
  "steps": {
    ":original": {
      "robot": "/upload/handle"
    },
    "subtitled": {
      "robot": "/video/subtitle",
      "preset": "ipad-high",
      "use": {
        "steps": [
          { "name": ":original", "fields": "video", "as": "video" },
          { "name": ":original", "fields": "subtitle", "as": "subtitles" }
        ]
      }
    }
  }
}
In the code block above, we have used the /upload/handle
Robot to import two different files, then declared a subtitled Step, where
we specified which of the uploaded files is the video and which is the subtitle file, i.e., the
/video/subtitle Robot's use parameter.
Note that "fields" within
usefilters consist of the input fields next to the name attribute. In other words, the name you give to your file while uploading it.
We can also try out this Template by simply running the following Node.js code, taking the webpage we want as an argument:
const { Transloadit } = require('transloadit')

const transloadit = new Transloadit({
  authKey: process.env.TRANSLOADIT_AUTH_KEY,
  authSecret: process.env.TRANSLOADIT_SECRET_KEY,
})

const options = {
  params: {
    steps: {
      ':original': {
        robot: '/upload/handle',
      },
      subtitled: {
        robot: '/video/subtitle',
        preset: 'ipad-high',
        use: {
          steps: [
            { name: ':original', fields: 'video', as: 'video' },
            { name: ':original', fields: 'subtitle', as: 'subtitles' },
          ],
        },
      },
    },
  },
}

transloadit.addFile('video', 'PATH_TO_LOCAL_VIDEO_FILE')
transloadit.addFile('subtitle', 'PATH_TO_LOCAL_SUBTITLE_FILE')
transloadit.createAssembly(options, (err, result) => {
  if (err) {
    throw err
  }
  console.log({ result })
})
The results
When checking the Assembly in my Transloadit dashboard, I notice that:
-
For the single file upload, my file was successfully uploaded to Transloadit. No further encoding was performed on the file, just as instructed in the Assembly Instructions
-
For the multiple file upload, my files were successfully uploaded and the subtitle file was burned into my video.
I hope this post has demonstrated how powerful and essential the /upload/handle Robot is, and how easy it is to access multiple files that were uploaded using this Robot.
In the next part of the Re-loadit series, we'll be talking about our /google/store Robot. So stay tuned!