Let's Build: spinning record GIF generator

As a newly-hired member of the Transloadit support team, I was familiarizing myself with our services when I came across a Stack Overflow question that piqued my interest as it allowed me to combine my love of music with our API. The question was whether our services could be used to generate an animation of a record spinning, and I thought this idea was interesting enough to turn into a blog post.
This article covers a number of exciting practices that you may wish to use in your projects and shows the versatility of the Transloadit service. We will be covering concepts such as using our Python SDK with external libraries to combine internal and external encoding, asynchronously combining two Templates, and using FFmpeg to expand the capabilities of our API. So without further ado, let's jump right in!
Prerequisites
Besides our before-mentioned Python SDK, we need to download a few other tools for our project today. We'll use OpenCV to perform bitwise calculations, in tandem with NumPy to help with local image processing. Both packages will be installed using the pip package installer.
Coupled with our packages, we need some assets to use, which you can download at the link below:
We'll be breaking up the code into chunks for the purpose of explaining things in this blog, but if you wish to download the complete project, please see the following Github repo.
Setting up the project
We need to create a project folder comprised of a new Python file and a .../../../../../../_assets/ folder
containing a ../Frames folder. Take the images from the links above and place them inside
.../../../../../../_assets/. Now we can install all our necessary packages. To do so, run the following commands
inside your console:
pip install pytransloadit
pip install numpy
pip install opencv-python
pip install requests
pip install future
Create a new Python file and import our packages.
from __future__ import print_function
from transloadit import client
import os
import requests
import cv2
import numpy as np
Next, create an instance of the Transloadit client.
tl = client.Transloadit(TRANSLOADIT_KEY, TRANSLOADIT_SECRET)
Finishing up, let's create a set of global variables for later use. Make sure img_name matches the
name of the album image, and that vinyl_path matches the name of the vinyl record image.
img_name = 'okcomputer'
img_path = 'Assets/{name}.jpg'.format(name=img_name)
vinyl_path = 'Assets/vinyl.png'
remove_bg_location = 'Assets/trimmed_image.png'
Now we are all set to make our first Template!
Templates
Head to your Transloadit console and create a blank Template. Make sure to note down your Template ID for later. Below, we have copied over our Template code, which is simply the JSON recipe to create your Transloadit magic. We'll run through each Step below and explain what's going on.
{
  "steps": {
    ":original": {
      "robot": "/upload/handle"
    },
    "resize": {
      "use": ":original",
      "robot": "/image/resize",
      "format": "png",
      "resize_strategy": "fillcrop",
      "width": 350,
      "height": 350,
      "imagemagick_stack": "{{stacks.imagemagick.recommended_version}}"
    }
  }
}
Our first Step :original handles uploading our input file. If you wish to upload a file
from a third-party location, you can take a look here at all our
supported services.
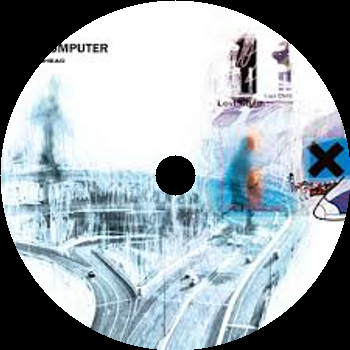
Next, resize handles cropping our image and sets the format to PNG. This is necessary to ensure
that the image is properly scaled on the vinyl record at the end.
Using our Templates
Since we are using multiple Templates, we need to create a small Python script to link them to each other. We will accomplish this by parsing our first Template's Assembly result, then taking the resulted temporary URL value and passing it onto our second Template.
The function below is passed our previously-noted Template ID, our image's file path, and
the name of the last Step in our Template (for our example, it would be
resize). It also contains a few optional parameters, like whether or not we want to return the URL
and, most importantly, fields. Using fields, we can pass variables into our Template so
we can change the parameters of our Template straight from our client 👌
def useTemplate(templateID, file_path='', result_name='', get_url=True, fields=''):
    assembly = tl.new_assembly({'template_id': templateID, 'fields': fields})

    if file_path != '':
        assembly.add_file(open(file_path, 'rb'))

    assembly_response = assembly.create(retries=5, wait=True)
    if get_url:
        assembly_url = assembly_response.data.get('results').get(result_name)[0].get('ssl_url')
        return assembly_url
We also need to create one more utility function to download our resized image to the .../../../../../../_assets/
folder.
def downloadImage(url, location):
    r = requests.get(url)
    image = open(location, 'wb')
    image.write(r.content)
    image.close()
Removing the background
This Template is straightforward; it enables the alpha channel on our PNG image, then sets all black pixels as transparent. However, this also means that we have to be careful when we're using album art with a black background - such as the Dark Side of the Moon by Pink Floyd.
{
  "steps": {
    ":original": {
      "robot": "/upload/handle"
    },
    "trimmed": {
      "use": ":original",
      "robot": "/image/resize",
      "alpha": "Activate",
      "type": "TrueColor",
      "transparent": "0,0,0",
      "imagemagick_stack": "{{stacks.imagemagick.recommended_version}}"
    }
  }
}
Overlaying the image
Now for some fields magic✨. We're going to take the URL of the image from our last Assembly and pass that in as a field into our Template. The /image/resize Robot will use the image as a watermark to overlay it on top of our vinyl record.
{
  "steps": {
    ":original": {
      "robot": "/upload/handle"
    },
    "watermark": {
      "use": ":original",
      "robot": "/image/resize",
      "watermark_url": "${fields.url}",
      "watermark_size": "33%",
      "watermark_position": "center",
      "imagemagick_stack": "{{stacks.imagemagick.recommended_version}}"
    }
  }
}
Turning it into a GIF!
This is our last Template. It might look daunting, but it's pretty simple when you break it down.
{
  "steps": {
    "import": {
      "robot": "/http/import",
      "url": "${fields.url}",
      "result": true
    },
    "animated": {
      "robot": "/video/merge",
      "use": "import",
      "result": true,
      "duration": "${fields.duration}",
      "framerate": "${fields.framerate}",
      "ffmpeg_stack": "{{stacks.ffmpeg.recommended_version}}",
      "ffmpeg": {
        "vf": "rotate=3.1415926535898*t:c=white@0, loop = -1",
        "f": "gif",
        "pix_fmt": "rgb24"
      }
    }
  }
}
The first Step "import is used to, well, import our file. We use our
/http/import Robot to bypass downloading our image
from the previous Assembly locally. This requires a URL to import from. Luckily, we can
easily use the field we made to pass a URL from our Python script.
Now, this is where we use FFmpeg to create our desired spinning effect. We use the rotate video flag
on the overlayed image, setting it to pi multiplied by our current frame number t. By appending
c:white@0, we can set the background color on our gif to white. Lastly, loop=-1 will infinitely
loop our GIF, finalising our vinyl record animation.
Tying it all together in Python
Now we should have all the pieces we need to make our spinning vinyl GIF!
Let's start by resizing the image and downloading it locally:
resize_url = useTemplate([RESIZE_IMAGE_TEMPLATE_ID], img_path, 'resize')
resized_image_location = 'Assets/resized_image.png'
downloadImage(resize_url, resized_image_location)
Next, we need to make our image masking function. Let's call it maskImage and give it an
img_path.
def maskImage(img_path):
    img = cv2.imread(img_path)
    mask = np.zeros(img.shape, dtype=np.uint8)
    mask = cv2.circle(mask, (175, 175), 175, (255, 255, 255), -1)
    mask = cv2.circle(mask, (175, 175), 20, (0, 0, 0), -1)
    result = cv2.bitwise_and(img, mask)

    result_location = 'Assets/mask.png'
    cv2.imwrite(result_location, result)

    remove_bg_url = useTemplate([REMOVING_BG_TEMPLATE_ID], result_location, 'trimmed')
    downloadImage(remove_bg_url, remove_bg_location)
    return remove_bg_url
The beginning of our function creates a black image with the exact same dimensions as our album art and then creates two white circles to produce a donut, like so:

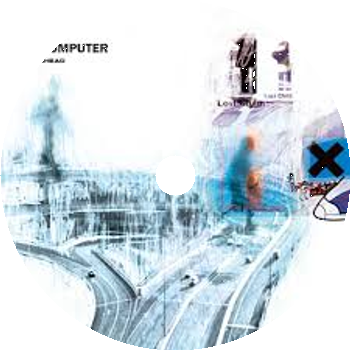
We now perform a bitwise AND operation on both the mask and our original image, meaning that a pixel from the original image is only shown in places where the mask has a white pixel - giving us the following result:
Finally, we use our earlier Template to make the black pixels transparent.
We call our function like so:
trimmed_url = maskImage(resized_image_location)
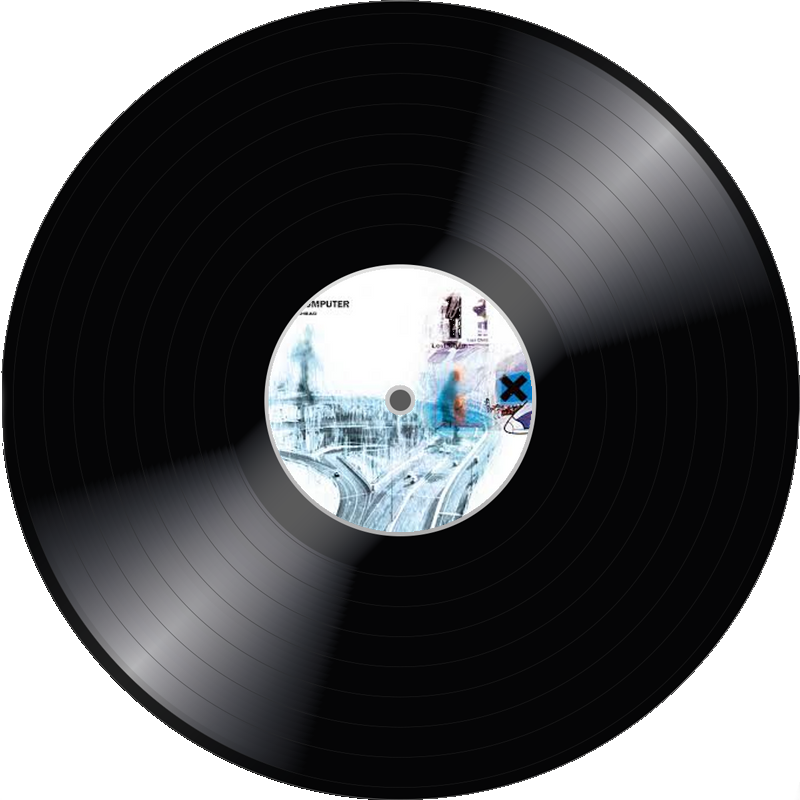
Now we need to put our donut on the vinyl record and make it spin! Let's watermark the image using our Template from before:
finished_watermarked_location = 'Assets/vinyl_finished.png'
vinyl_url = useTemplate([WATERMARK_IMAGE_TEMPLATE_ID], vinyl_path, 'watermark', True, {'url': trimmed_url})
Now, by passing the still image onto our GIF-generating Template along with a framerate and length, which we define from our script, we can make it spin!
frame_rate = 60
length = 2

final_gif_url = useTemplate('[ROTATING_GIF_TEMPLATE_ID]',
                            result_name='animated',
                            get_url=True,
                            fields={'url': vinyl_url, 'duration': length, 'framerate': frame_rate})
Finally, we can download the result locally.
final_gif_location = 'Assets/finished_gif.gif'
downloadImage(final_gif_url, final_gif_location)
And there, at last, we have it: our very own animated spinning vinyl record!🎉
I hope you enjoyed the process of making this, and maybe you've even learned some things about the Transloadit API that you can use on your next venture! And if you want to take this project even further, why not make it an MP4 and add some music to go along with the record, or use Uppy to let users upload their own images to put on a spinning vinyl record?