No-code real-time video uploading with Bubble & Transloadit

The new generation of inventions has brought about the rise of no-code software, which offers users the ease of building MVPs and such — all without writing a single line of code. One platform that allows you to do this is Bubble and we have just created a plugin for it. In this installment of "Let's Build", we'll show how you can use this plugin in combination with our own nifty Robots to add uploading and processing capablities to your website.

What is Bubble?
Bubble lets you build software without writing code. It offers a drag-and-drop editor, gives you pixel-perfect control and boasts over five hundred plugins that could help you build more custom features for your app. Bubble also offers real-time database events called "Things", which store and update your UI every time new data arrives. How interesting!
In this tutorial, we will create a real-time video feed. This app takes a video or an image, appends an existing video and then returns the new video, which is then updated on Bubble without reloading your page.
Why bubble?
We were approached recently by Nathan Altman, an artist and builder who led several large-scale projects at the famous Burning Man event (2015 Temple, 2016 SpaceWhale, 2017 Man Base).
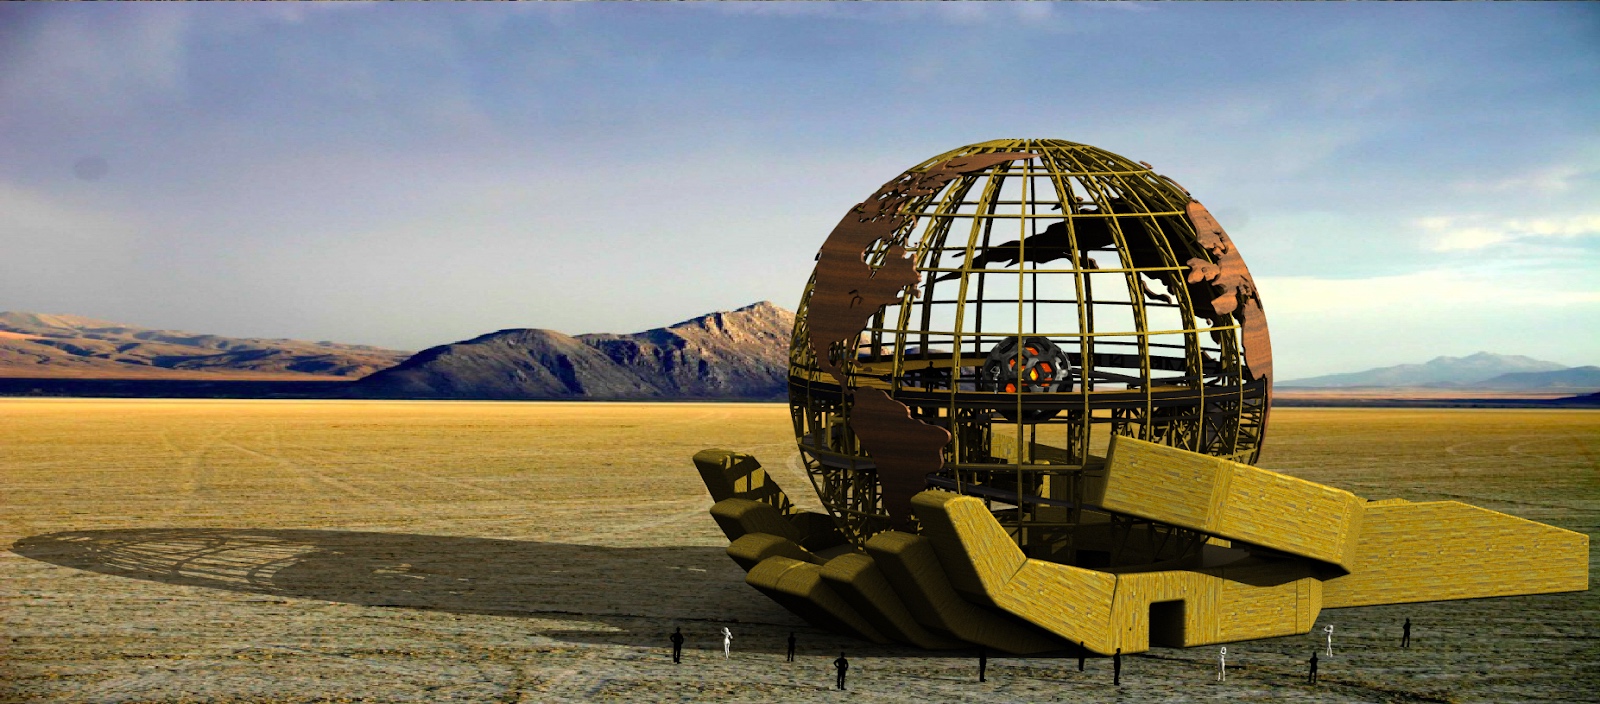
Nathan had been working on an idea for a new installation, the InnerSun project. In his own words:
It's a massive 84-foot (25 meter) globe held by over a hundred thousand hands from every country around the world. The first mission is to inspire more than a hundred thousand people to lend their literal hand in the project. To do this, we are building a web app and asking anyone who is willing to take a selfie the question "What Keeps You Alive?"
When Nathan turned to Transloadit for help with media encoding at this scale, his project immediately grabbed our attention. We were interested to see if it would be possible to prototype the basic functionality on Bubble, with no code written.
As it turns out: yes, we did have to write some code. But the good news is that you won't have to, because you can re-use this work as a newly-created Bubble Plugin 😄
As we progressed, we took down notes, which we'll present in this post in hopes of helping others that are looking to integrate with Bubble.
How we handled the challenge
We looked at Bubble's API and what we could do with it. We found out we could easily create a plugin that integrates Transloadit. The flow was simple:
- Use Uppy's Robodog (Deprecated)* to display a file picker while exposing a function that could be called from Bubble to do this.
- Ask webbuilders to supply their Transloadit Auth Key and Template ID.
- Upload the files to Transloadit, passing in the Auth Key and Template ID.
- Transloadit notifies the notify_url in the Template.
The flow above seeks to reduce the webbuilder's time to about 2-5 minutes for full integration. What the webbuilder has to do on Bubble is:
- Attach the exposed function to a button to trigger the Uppy Modal.
- Supply the needed Auth Key and Template ID on the settings page.
- Create an API endpoint on Bubble that receives the Notification when the Assembly is done encoding.
*Robodog has now been deprecated. You can now use the Transloadit Plugin.
How does the plugin integrate
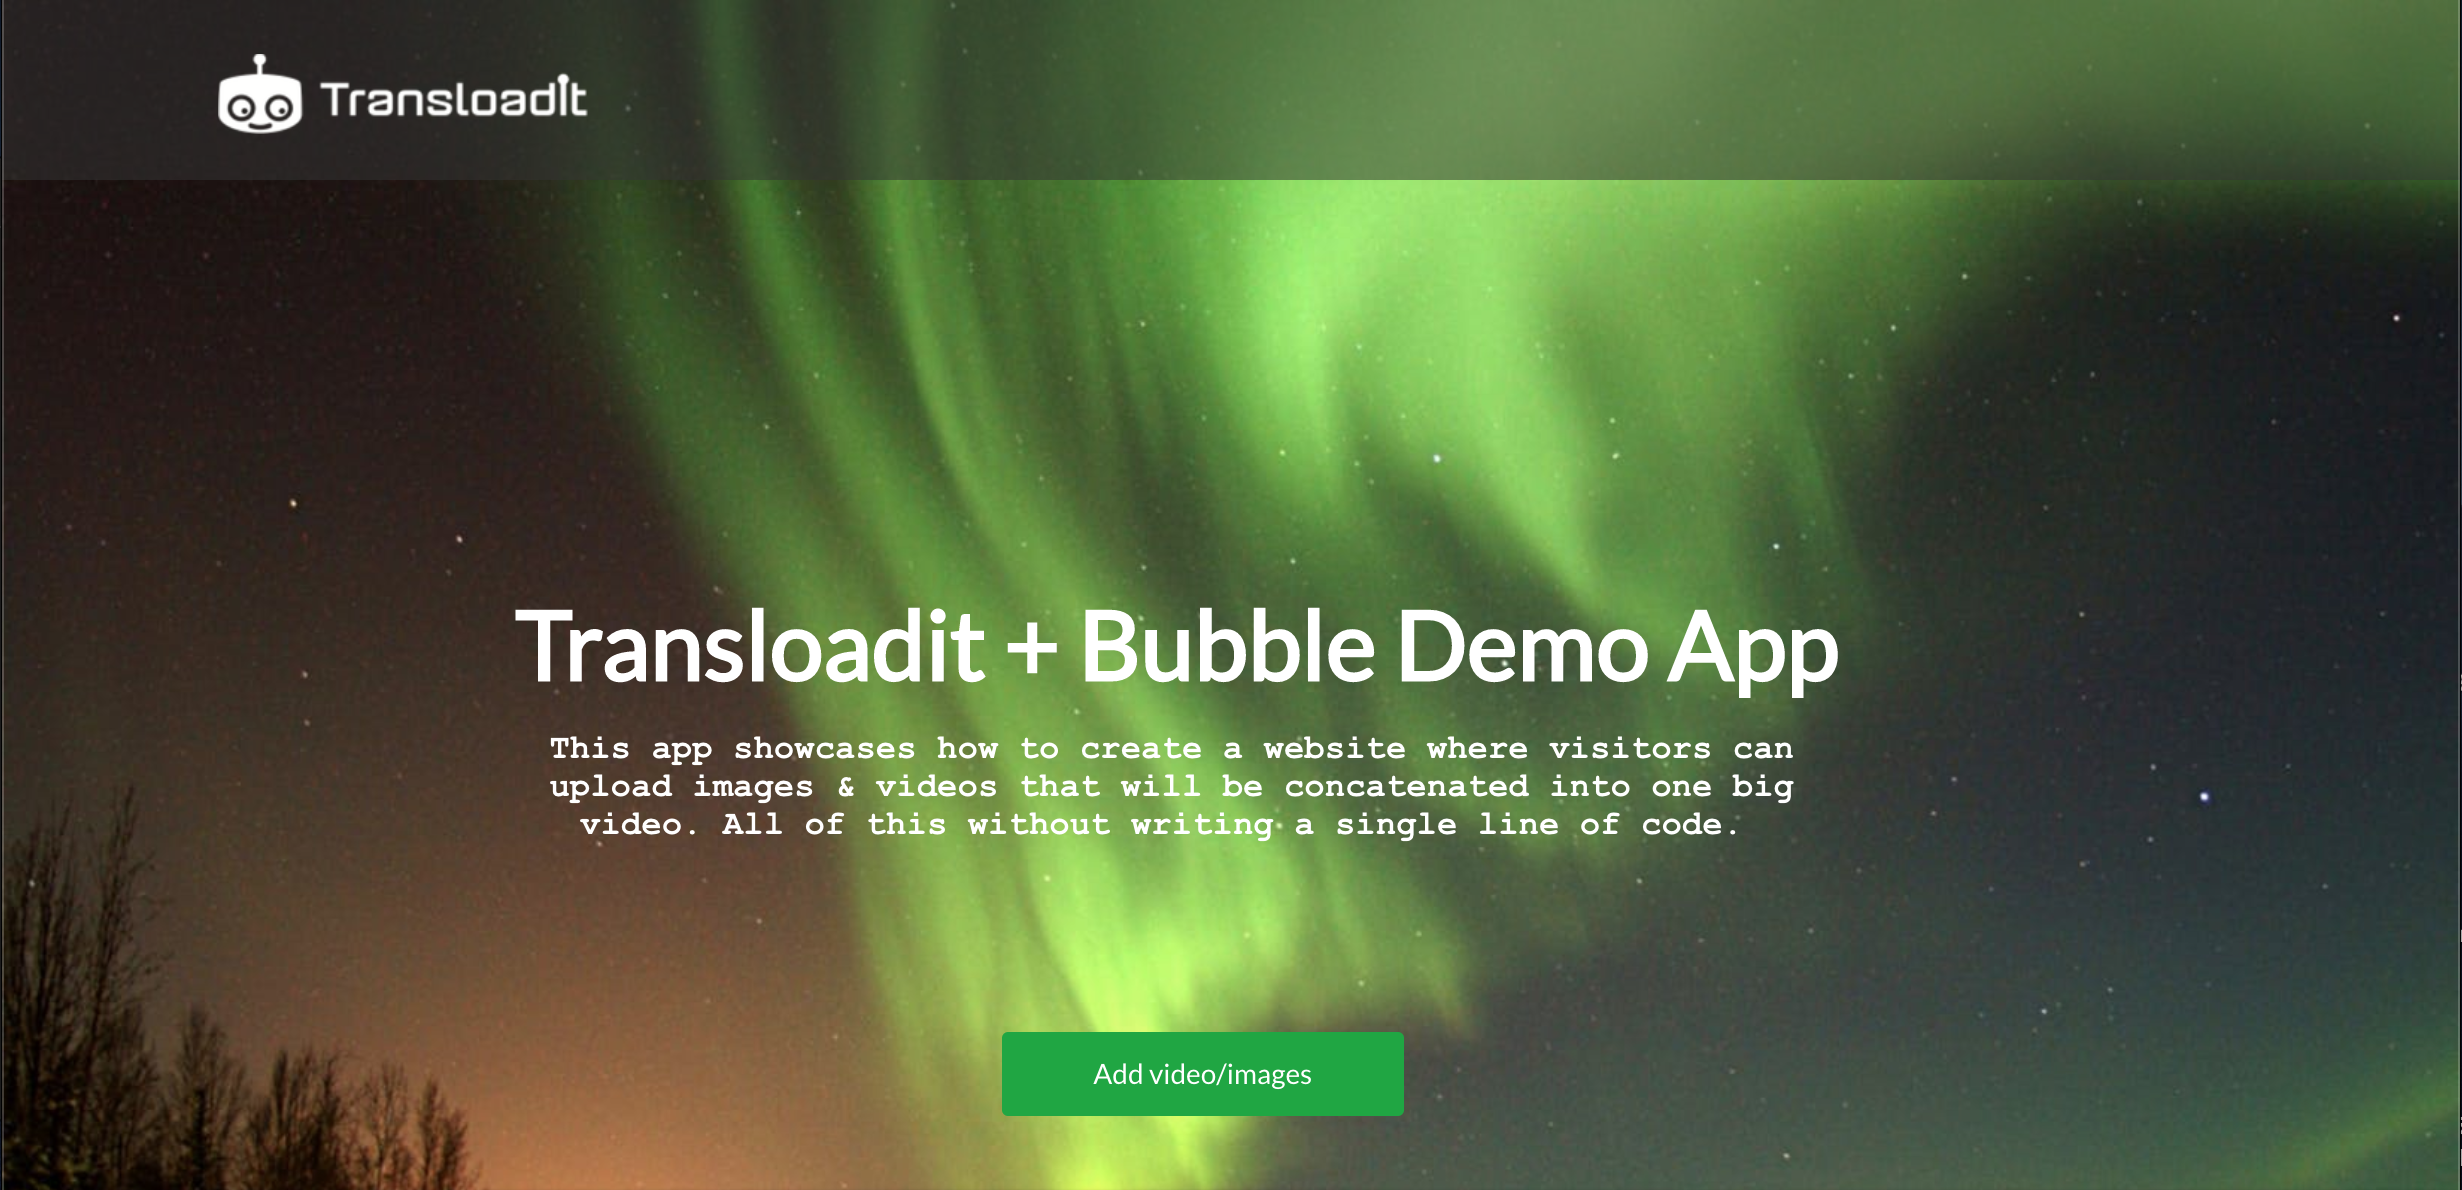
First, we need to sign up on Bubble. Once we have signed up, we need to create an application by clicking on the "NEW APP" button on your dashboard. For this write-up, I named my app transloaditIntegration. Once the app has been created, we will be directed to the plugin editor. We can now go ahead with the default Template provided, deleting all blocks apart from the header with the button named Add Video/images. It should end up looking like this:
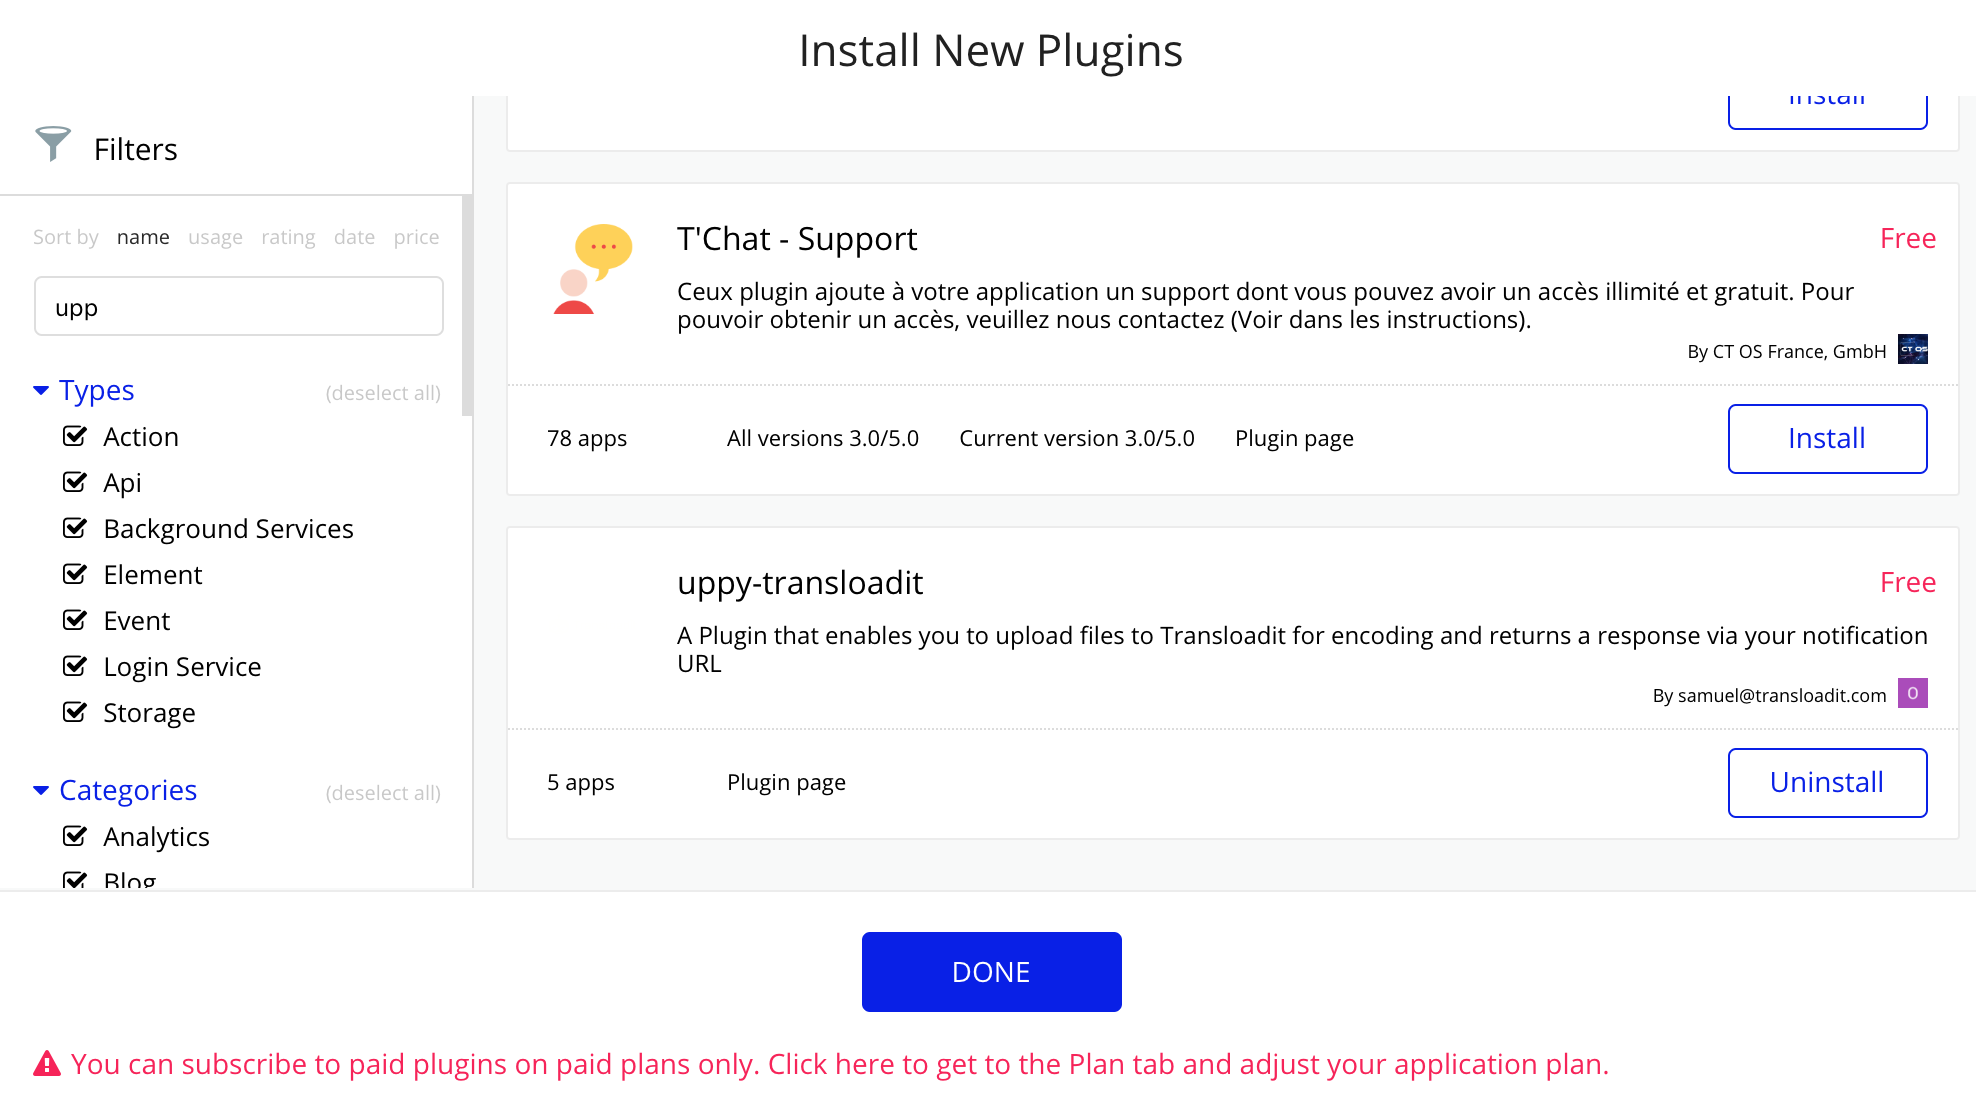
Next, let's move to the plugins section, where we click the "Add Plugins" button. Search for uppy-transloadit and install it (see image below). Once installed, we're presented with a prompt to input our Auth Key, Assembly Notification URL and the Template ID we will be using. We are yet to create a Template for our use case, let's do that now.
Creating a Transloadit Template
Head over to Transloadit.com, move to the Templates section, and create a new Template as shown below:
{
  "steps": {
    ":original": {
      "robot": "/upload/handle"
    },
    "preroll_imported": {
      "robot": "/http/import",
      "result": true,
      "url": "https://demos.transloadit.com/inputs/waves10.mp4"
    },
    "audio_imported": {
      "robot": "/http/import",
      "result": true,
      "url": "https://demos.transloadit.com/blank-audio/5-seconds-of-silence.mp3"
    },
    "preroll_resized": {
      "use": ["preroll_imported"],
      "robot": "/video/encode",
      "result": true,
      "background": "#000000",
      "ffmpeg_stack": "v3.3.3",
      "height": 270,
      "preset": "ipad-high",
      "resize_strategy": "pad",
      "width": 480
    },
    "images": {
      "use": ":original",
      "robot": "/file/filter",
      "accepts": [["${file.type}", "==", "image"]],
      "error_on_decline": false
    },
    "videos": {
      "use": ":original",
      "robot": "/file/filter",
      "accepts": [["${file.type}", "==", "video"]],
      "error_on_decline": false
    },
    "audio_filtered": {
      "use": "audio_imported",
      "robot": "/file/filter",
      "accepts": [["${file.type}", "==", "audio"]],
      "error_on_decline": true
    },
    "images_resized": {
      "use": "images",
      "robot": "/image/resize",
      "imagemagick_stack": "v3.0.1",
      "height": 270,
      "width": 480
    },
    "video_resized": {
      "use": "videos",
      "robot": "/video/encode",
      "ffmpeg_stack": "v3.3.3",
      "preset": "ipad-high",
      "resize_strategy": "pad",
      "height": 270,
      "width": 480
    },
    "image_converted": {
      "result": true,
      "ffmpeg_stack": "v3.3.3",
      "height": 270,
      "width": 480,
      "robot": "/video/merge",
      "preset": "ipad-high",
      "use": {
        "steps": [
          {
            "name": "audio_imported",
            "as": "audio"
          },
          {
            "name": "images_resized",
            "as": "image"
          }
        ]
      }
    },
    "passed_media": {
      "use": ["video_resized", "image_converted"],
      "robot": "/file/filter",
      "accepts": [["${file.type}", "==", "video"]],
      "error_on_decline": true
    },
    "concatenated": {
      "use": {
        "steps": [
          {
            "name": "passed_media",
            "as": "video_1"
          },
          {
            "name": "preroll_resized",
            "as": "video_2"
          }
        ]
      },
      "robot": "/video/concat",
      "result": true,
      "ffmpeg_stack": "v3.3.3",
      "preset": "ipad-high"
    },
    "exported": {
      "use": ["concatenated"],
      "robot": "/s3/store",
      "credentials": "s3_cred"
    }
  }
}
What does this Template do?
The first Step shows the /upload/handle Robot, which is used to receive the file that will be uploaded by the user. The next two Steps use the /http/import Robot to import the video we will merge with, as well as a blank audio file (which will be used as an audio track if the user uploads a picture). The next step resizes the imported video to our preferred size (270 * 480). We move ahead by filtering the content of the /upload/handle Robot. We want to allow only videos or images to pass in two separate Steps, so we can allow users to upload either of the two. We also resize any images supplied to our preferred size.
At this point, we have a small issue to deal with: directly merging images with videos is not possible. Luckily, we can solve this by converting the image to a 5-second video, using the /video/merge Robot and supplying the blank audio file as the audio track. We'll now place another filter that only accepts video, either the initially uploaded video or our newly converted video from an image. Lastly, we use the /video/concat Robot to merge these two videos together and then export them to an S3 storage bucket using the /s3/store Robot.
Once we save the Template above, we will receive our Template ID.
Hooking the plugin's open method and exposing an API
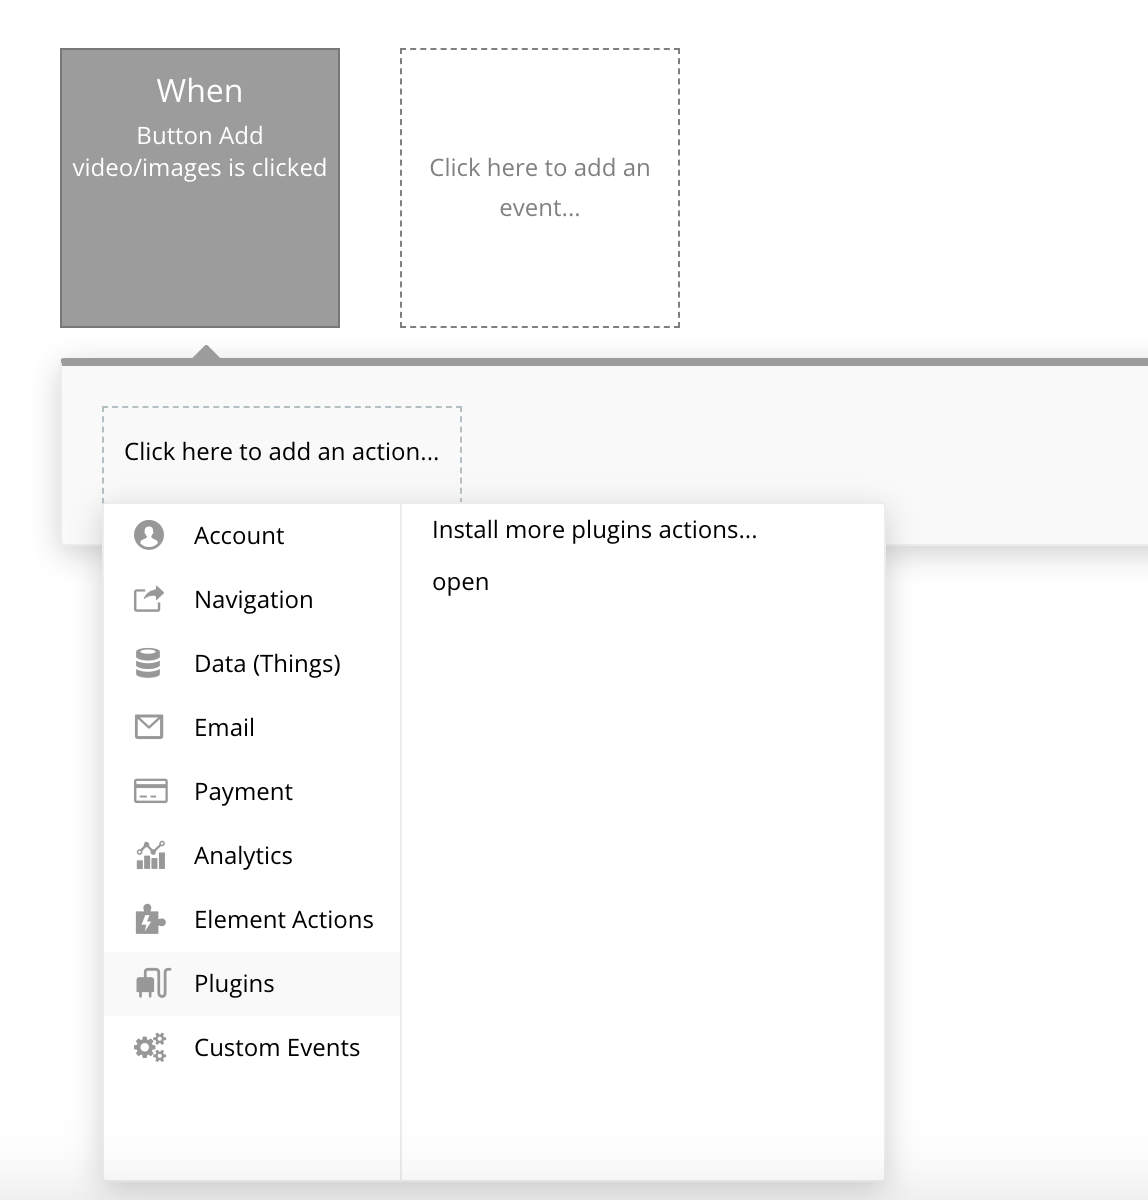
The uppy-transloadit plugin exposes an action called open. We need to attach this method to
the workflow of our Add videos/images button. To do this, right-click, then select start/edit
workflow. Once the new page pops up, add a new action by selecting the open action of our
plugin.
Next, we need to expose an API endpoint, which we will use as the Assembly Notification URL. Navigate to settings > API then check the box that says: This App exposes a Workflow API. Proceed to create an API workflow by clicking the dropdown at the top left near the Bubble logo and select API workflows. On the page that appears, add a new endpoint (I called mine transloaditendpoint). By default, we can define the parameters that should be present in the call to the API. However, there are a lot of fields to input, so here's a little trick I used:
- Open the application editor in another tab and move to the plugins settings page.
- Input your Auth Key and Template ID and then move back to the previous tab where we are setting up the endpoint.
- In the parameter definition box, select detect request data.
- It shows a button labeled detect data, click the button and copy the link given.
- Navigate to the new tab and input the link as your notify url and preview the app.
- In the new app that opens, click the Add video/image button, then upload a file.
- Navigate back to the other tab and save the detected data.
- Go back to the plugin settings and remove the /initialize part of the endpoint.
Now that we have been able to receive the data from Transloadit via the API endpoint, how do we translate this into a video feed?
Creating a bubble thing
We do so by creating a Bubble thing, where we can store the videos that have been encoded. Navigate to Data and create a new thing called videos. Next, create a new field in the videos thing called video of type text. Finally, let's set up our workflow to create a new thing every time a new video has been encoded.
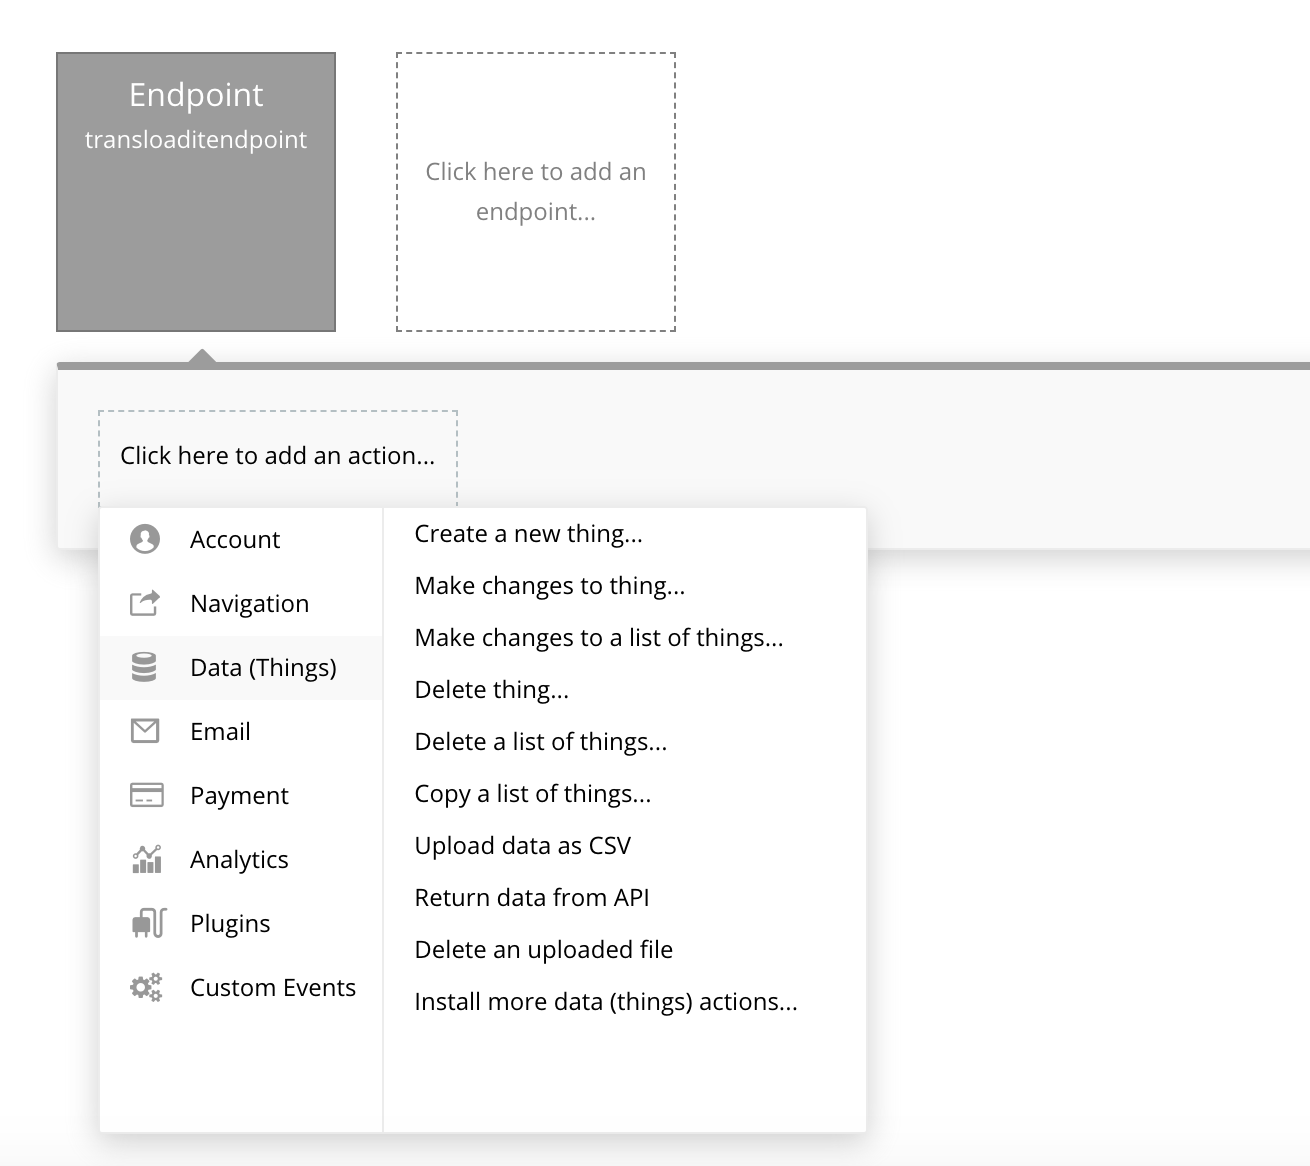
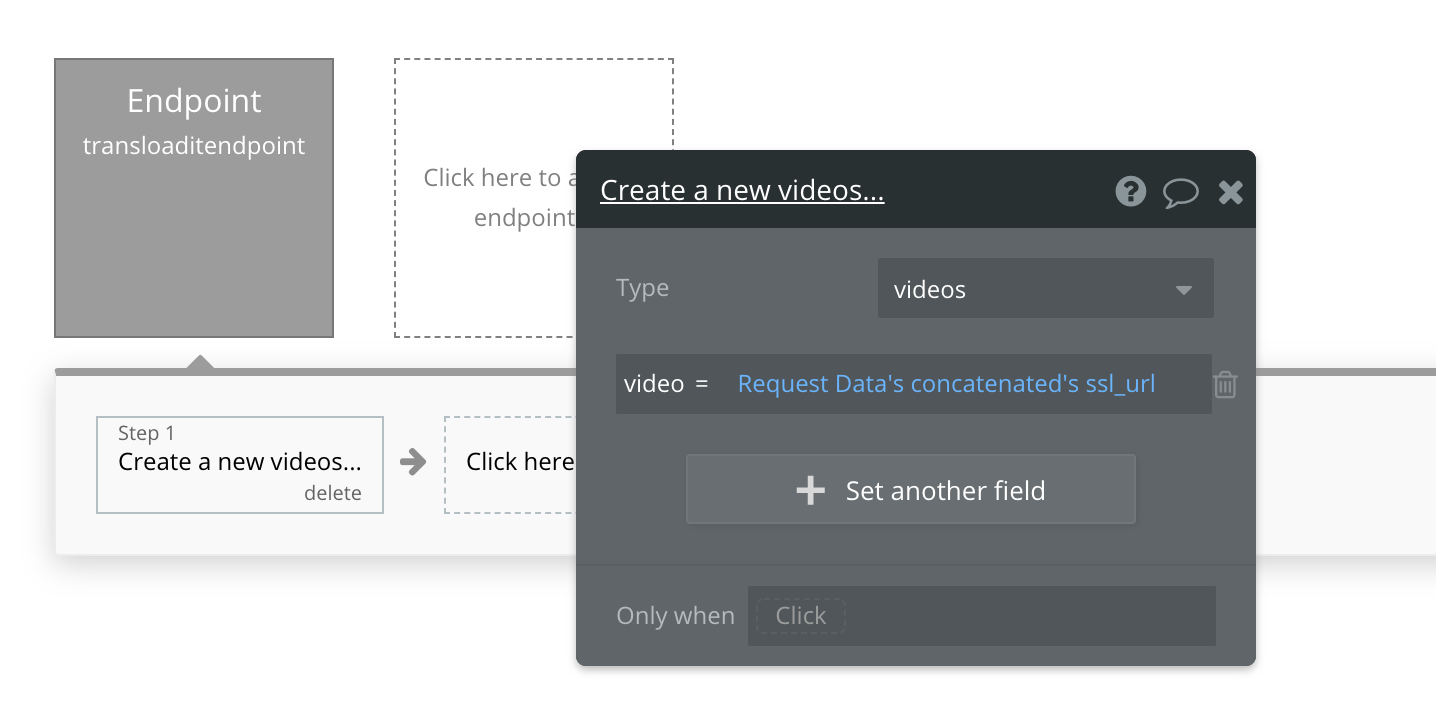
Navigate to API workflows and select the transloaditendpoint. Next, we create a new action that says create a new thing. Select the type to be videos (the thing we created) and set the video field to Request Data's concatenated's ssl_url (The ssl_url property comes from our concatenated Step from the Assembly Instructions.)
Displaying the data.
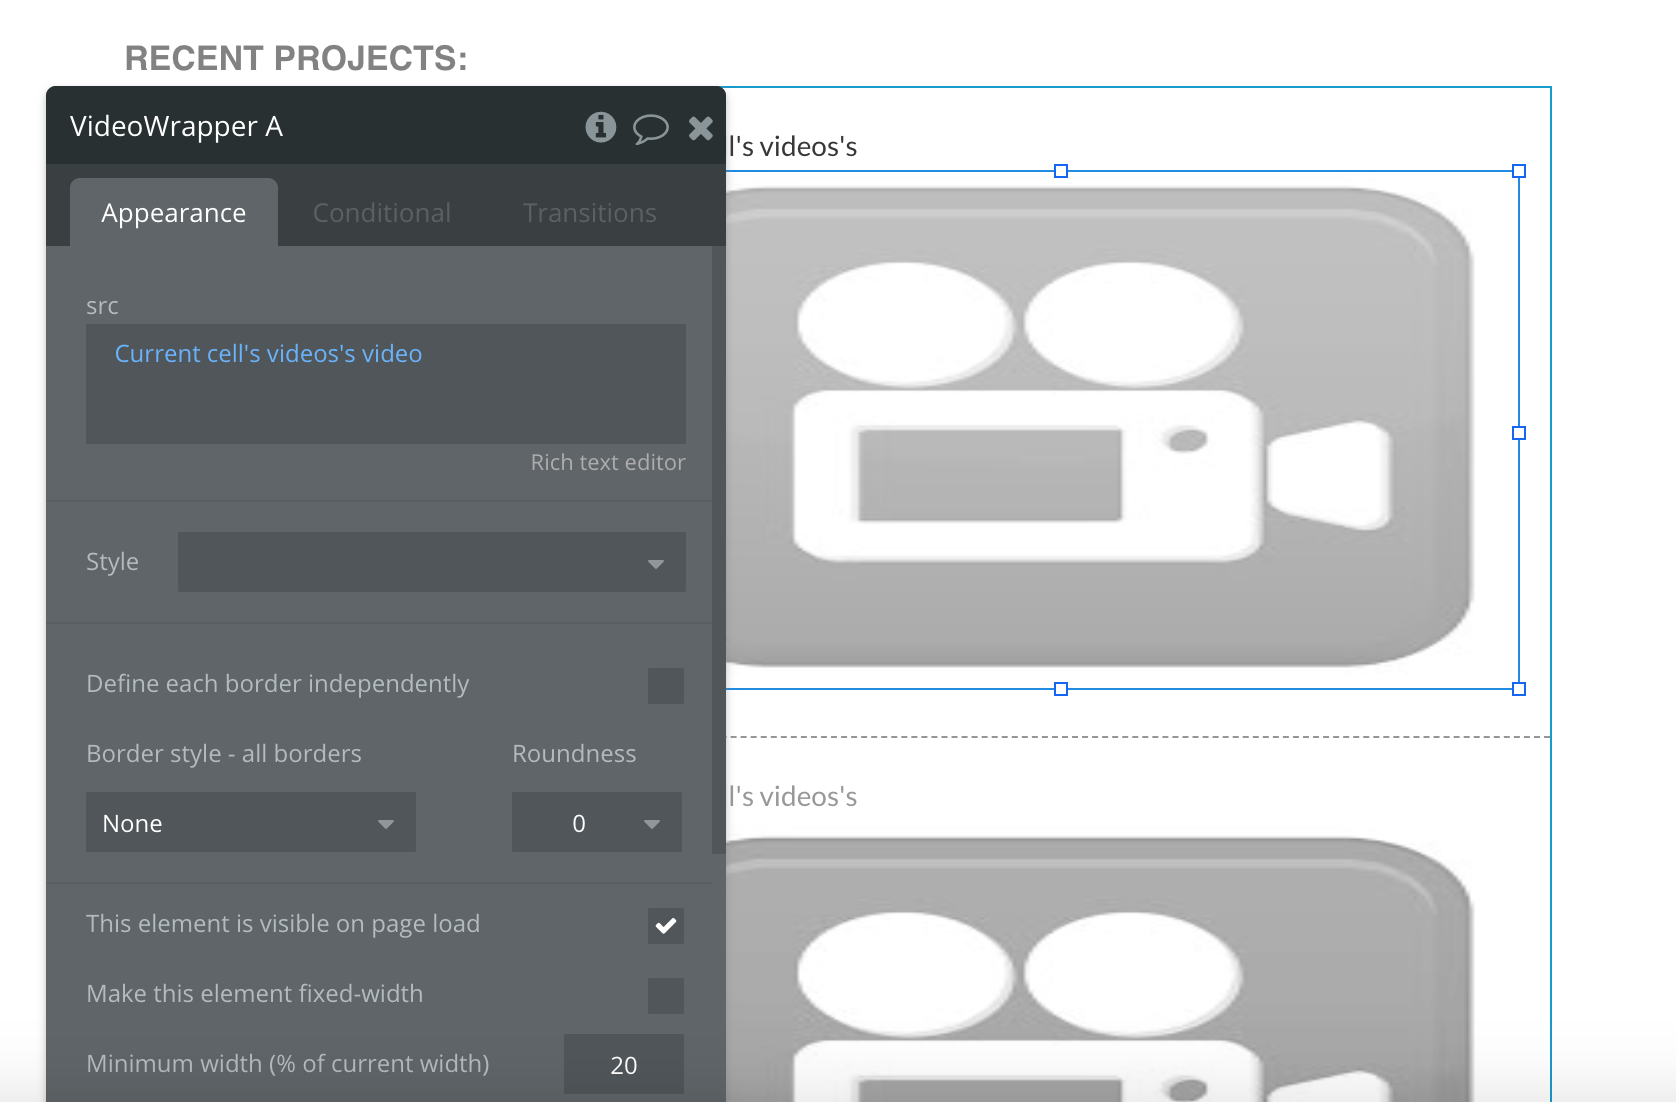
Time to show our video to the world! From the design panel, drag a Repeating Group to our UI and set its type of content to videos. The default Bubble video element only allows a video from YouTube or Vimeo. To display our videos, the Uppy-Transloadit plugin provides a video element called videoWrapper. Next, we will drag the videoWrapper element to fit in one cell of our repeating group and set the videoWrapper's src to Current cell's Video's video. That's it. Now we can preview our app and see it show up in real time.
Conclusion
I hope to have succeeded in showing you how easy it is to integrate Transloadit with Bubble. Now it's time for you to let your creativity run wild! We have provided a sample Template in case you need to build something just like this, but you might want to build your own, improved iteration of this. You could even add more fun stuff like watermarking your video and what have you. Don't let your dreams be dreams!
If you'd like to try the tech demo (sorry, we didn't spend time on the design this time 😄) here's a link!