

Upload once, transform forever

Most image pipelines make a bet at upload time. A file comes in, a worker renders the thumbnail, the medium, the large, and the WebP variants, and stores all of them next to the original. The bet is that these are the sizes the front end will want. Then design adds a card layout that needs 600 pixels wide, AVIF turns out to be worth it, marketing wants square crops — and every change is a batch job over the whole library, plus more variants to keep forever.
The alternative is the model Cloudinary and Imgix made familiar: store one original, describe the
derivative in the URL, render it on the first request, and cache it at the edge. Transloadit has
done the CDN half of that for years — the Smart CDN with
URL Transform — but you had to bring the origin: a bucket, credentials, a
/s3/import step. Transloadit Storage supplies the origin. The original goes into your workspace
once, with any S3 client or with an Assembly, and from then on every derivative is a URL. And what
sits behind that URL is not a resizer with twenty options but most of the Robot catalogue:
/image/resize, /image/facedetect, /document/thumbs, /file/preview, /image/bgremove, and
so on.
Transloadit Storage is in private preview. If you want to try it before general availability, ask us to enable it for your workspace.
This tutorial uploads a few originals, creates one Template, and builds a gallery page whose
<picture> elements ask for three widths in AVIF, WebP, and JPEG, plus square thumbnails — none
of which exist until a browser asks for them. Step 4 does the same for a PDF and a video. Node.js
and the official SDK throughout; nothing is pre-rendered at any point.
What you need
- Node.js 22 or newer, and the AWS CLI (any S3 client works for Step 1; the CLI is the shortest to show).
- A Transloadit account with two Auth Keys from Console → Credentials → Auth Keys: your regular API key (for the Template API and the S3 endpoint) and a key enabled for Smart CDN (Smart CDN keys can only sign URLs, so leaking one cannot create Assemblies).
- The slug of your workspace — the part after
/c/in the Console URL, for examplemytransloadit-toystory-app.
Create a project, download some originals, and write a .env file:
mkdir upload-once && cd upload-once
npm init -y && npm pkg set type=module
npm install @transloadit/node @transloadit/utils
mkdir originals
curl -o originals/chameleon.jpg https://demos.transloadit.com/inputs/chameleon.jpg
curl -o originals/prinsengracht.jpg https://demos.transloadit.com/inputs/prinsengracht.jpg
curl -o originals/guide.pdf https://demos.transloadit.com/inputs/aws-cloud-best-practices.pdf
curl -o originals/bunny.mp4 https://demos.transloadit.com/inputs/big-buck-bunny-10s.mp4
TRANSLOADIT_KEY=your-api-auth-key
TRANSLOADIT_SECRET=your-api-auth-secret
TRANSLOADIT_CDN_KEY=your-smart-cdn-auth-key
TRANSLOADIT_CDN_SECRET=your-smart-cdn-auth-secret
TRANSLOADIT_WORKSPACE=your-workspace-slug
Node reads it with --env-file, so there is no dotenv dependency; for the shell commands in Step 1,
load it with set -a; . ./.env; set +a. During the preview you may also have received endpoint
overrides from us (TRANSLOADIT_ENDPOINT, TRANSLOADIT_STORAGE_S3_ENDPOINT,
TRANSLOADIT_SMART_CDN_BASE_URL, TRANSLOADIT_SMART_CDN_EXTRA_PARAMS); the scripts below pick
those up when present and fall back to the production defaults otherwise.
Step 1: Upload the originals — once
Transloadit Storage is S3-compatible: your API Auth Key and Secret are the credentials and your
workspace slug is the bucket. Copy the originals folder in:
set -a; . ./.env; set +a
export AWS_ACCESS_KEY_ID="$TRANSLOADIT_KEY" AWS_SECRET_ACCESS_KEY="$TRANSLOADIT_SECRET"
aws --endpoint-url "${TRANSLOADIT_STORAGE_S3_ENDPOINT:-https://storage.transloadit.com}" \
  s3 cp originals/ "s3://$TRANSLOADIT_WORKSPACE/originals/" --recursive
upload: originals/bunny.mp4 to s3://your-workspace-slug/originals/bunny.mp4
upload: originals/guide.pdf to s3://your-workspace-slug/originals/guide.pdf
upload: originals/chameleon.jpg to s3://your-workspace-slug/originals/chameleon.jpg
upload: originals/prinsengracht.jpg to s3://your-workspace-slug/originals/prinsengracht.jpg
That is the last time these files are touched. Nothing is processed at upload time; the 9 MB and
14 MB photos stay exactly as they are, and so does the PDF and the video. Files that arrive
through other routes — an upload form with the /transloadit/store Robot, aws s3 sync from a
build, the Console's File Library — land in the same storage and work the same way in the steps
below.
Step 2: One Template for every image derivative
A Smart CDN URL names a Template and a file, and carries parameters:
https://<workspace>.tlcdn.com/<template>/<path>?w=400&format=webp
The Smart CDN runs the Template with the file as input and the query parameters as
Assembly fields: ${fields.input} is the path, and every
other parameter is available as ${fields.<name>}. So one Template that reads its width, height,
resize strategy, format, and quality from fields covers every image derivative you will ever
need. Parameters the URL leaves out fall back to the Template's own fields:
import { Transloadit } from '@transloadit/node'

const client = new Transloadit({
  authKey: process.env.TRANSLOADIT_KEY,
  authSecret: process.env.TRANSLOADIT_SECRET,
  endpoint: process.env.TRANSLOADIT_ENDPOINT,
})

const templates = {
  // Any stored image, at the size, fit, format, and quality the URL asks for.
  'cdn-image': {
    steps: {
      imported: { robot: '/transloadit/import', path: '${fields.input}' },
      resized: {
        robot: '/image/resize',
        use: 'imported',
        width: '${fields.w}',
        height: '${fields.h}',
        resize_strategy: '${fields.fit}',
        format: '${fields.format}',
        quality: '${fields.q}',
        imagemagick_stack: 'v3.0.0',
      },
      served: { robot: '/file/serve', use: 'resized' },
    },
    // Defaults for parameters the URL does not set: at most 1600 px on the longer side, JPEG.
    fields: { w: 1600, h: 1600, fit: 'fit', format: 'jpg', q: 82 },
  },
}

// Template names are unique per workspace: update instead of failing when this script runs again.
const existing = new Map()
for await (const item of client.streamTemplates()) existing.set(item.name, item)
for (const [name, template] of Object.entries(templates)) {
  // require_signature_auth: only URLs signed with your Smart CDN key are rendered.
  const params = { name, template, require_signature_auth: 1 }
  if (existing.has(name)) await client.editTemplate(existing.get(name).id, params)
  else await client.createTemplate(params)
  console.log(`Template ${name} ${existing.has(name) ? 'updated' : 'created'}`)
}
node --env-file=.env create-template.js
# Template cdn-image created
Two details matter here. require_signature_auth makes the Template refuse any URL that is not
signed — and a signature covers all parameters, so nobody can take a URL you published and change
w=400 into w=8000 on every image you own. And fields is what makes a single Template
practical: ${fields.h} in a Template only works when h has a value, so the defaults keep a URL
like ?w=400 valid.
Step 3: Sign URLs and build the page
Signing happens on your server, with the Smart CDN key. One helper does it for every derivative:
import { getSignedSmartCdnUrl } from '@transloadit/utils/node'

// Preview environments only; both are empty in production.
const baseUrl = process.env.TRANSLOADIT_SMART_CDN_BASE_URL
const extraParams = Object.fromEntries(
  new URLSearchParams(process.env.TRANSLOADIT_SMART_CDN_EXTRA_PARAMS ?? ''),
)

const DAY = 24 * 60 * 60 * 1000

/** A signed Smart CDN URL that renders `path` through `template` with the given parameters. */
export function cdnUrl(template, path, params = {}) {
  return getSignedSmartCdnUrl({
    workspace: process.env.TRANSLOADIT_WORKSPACE,
    template,
    input: path,
    authKey: process.env.TRANSLOADIT_CDN_KEY,
    authSecret: process.env.TRANSLOADIT_CDN_SECRET,
    // Round the expiry to a whole day: the same derivative then gets the same URL all day, and
    // identical URLs are what make browser and edge caches hit. Valid for one to two days.
    expiresAt: (Math.floor(Date.now() / DAY) + 2) * DAY,
    baseUrl,
    urlParams: { ...params, ...extraParams },
  })
}

export const imageUrl = (path, params) => cdnUrl('cdn-image', path, params)
The expiry is doing double duty. It is the access-control window, and it also bounds how long the
Smart CDN and browsers may cache the response: a URL that expires in 36 hours is cached for at most
36 hours. If every render produced a fresh exp, every render would also produce a fresh URL and a
fresh cache miss — hence the rounding.
Check a few derivatives before building the page. The script prints the status, type, and size of each; it does not print the URLs, because a signed URL is a credential until it expires:
import { imageUrl } from './cdn.js'

const variants = [
  {}, // Template defaults: at most 1600 px, JPEG, quality 82
  { w: 400 },
  { w: 400, format: 'webp' },
  { w: 400, format: 'avif' },
  { w: 400, h: 400, fit: 'fillcrop' },
  { w: 400, q: 40 },
]

let res
for (const params of variants) {
  res = await fetch(imageUrl('originals/chameleon.jpg', params))
  if (!res.ok) throw new Error(`Derivative request failed (${res.status})`)
  const kb = Math.round((await res.arrayBuffer()).byteLength / 1024)
  const label = new URLSearchParams(params).toString() || '(defaults)'
  console.log(`${label.padEnd(26)} ${res.status} ${res.headers.get('content-type').padEnd(10)} ${kb} kB`)
}
console.log('cache-control:', res.headers.get('cache-control'))
node --env-file=.env check.js
(defaults)                 200 image/jpeg 244 kB
w=400                      200 image/jpeg 63 kB
w=400&format=webp          200 image/webp 49 kB
w=400&format=avif          200 image/avif 67 kB
w=400&h=400&fit=fillcrop   200 image/jpeg 70 kB
w=400&q=40                 200 image/jpeg 49 kB
cache-control: public, max-age=129599, s-maxage=86400
Sizes will differ a little from run to run. In the cache header, max-age is how long a browser
may keep the response — the rest of the signature's life, up to three days — and s-maxage caps
shared caches such as the Smart CDN's edge at one day, which is why the two differ. Six
derivatives, each rendered in under a second in this example. Render time depends on the source
and transformation; later requests can use the cached result while it remains available.
Now the page. Each photo becomes a <picture> with AVIF, WebP, and JPEG sources at three
widths; the browser picks one source and one width, and only that derivative is ever rendered:
import { writeFile } from 'node:fs/promises'
import { imageUrl } from './cdn.js'

const photos = [
  { path: 'originals/chameleon.jpg', alt: 'A green chameleon on a branch' },
  { path: 'originals/prinsengracht.jpg', alt: 'Canal houses and a bridge on the Prinsengracht in winter' },
]
const widths = [400, 800, 1600]
const sizes = '(max-width: 700px) calc(100vw - 2rem), 640px'
const attr = (url) => url.replaceAll('&', '&')

const srcset = (path, format) =>
  widths.map((w) => `${attr(imageUrl(path, { w, format }))} ${w}w`).join(', ')

const figure = ({ path, alt }) => `
<figure>
  <picture>
    <source type="image/avif" srcset="${srcset(path, 'avif')}" sizes="${sizes}">
    <source type="image/webp" srcset="${srcset(path, 'webp')}" sizes="${sizes}">
    <img src="${attr(imageUrl(path, { w: 800 }))}" srcset="${srcset(path, 'jpg')}" sizes="${sizes}" alt="${alt}">
  </picture>
  <figcaption></figcaption>
</figure>`

const square = (path, w) => attr(imageUrl(path, { w, h: w, fit: 'fillcrop' }))
const thumb = ({ path, alt }) =>
  `<img src="${square(path, 160)}" srcset="${square(path, 160)} 1x, ${square(path, 320)} 2x" width="160" height="160" alt="${alt} (square crop)">`

await writeFile(
  'gallery.html',
  `<!doctype html>
<html lang="en">
<meta charset="utf-8">
<meta name="viewport" content="width=device-width, initial-scale=1">
<title>Upload once, transform forever</title>
<style>
  body { font: 16px system-ui; max-width: 640px; margin: 2rem auto; padding: 0 1rem; }
  figure { margin: 0 0 1.5rem; }
  img { max-width: 100%; height: auto; display: block; border-radius: 8px; }
  figcaption { color: #666; font-size: 14px; margin-top: 0.25rem; }
  .thumbs { display: flex; gap: 8px; }
</style>
<h1>One original, many derivatives</h1>
${photos.map(figure).join('\n')}
<div class="thumbs">${photos.map(thumb).join('')}</div>
<script>
  // Show which derivative the browser picked: format and width are right there in the URL it loaded.
  for (const figure of document.querySelectorAll('figure')) {
    const img = figure.querySelector('img')
    const show = () => {
      const params = new URL(img.currentSrc).searchParams
      figure.querySelector('figcaption').textContent =
        'Served as ' + (params.get('format') ?? 'jpg') + ', ' + params.get('w') + ' px wide'
    }
    img.complete ? show() : img.addEventListener('load', show)
  }
</script>
`,
)
console.log('Wrote gallery.html')
node --env-file=.env gallery.js && open gallery.html # xdg-open on Linux
Open the page in a phone-sized window and in a desktop one. The caption under each photo reads the
chosen derivative off the URL the browser actually loaded: on a phone with a 1× screen it is the
400-pixel AVIF, in a desktop window the 800-pixel one, and a 2× display asks for the next width up.
The square thumbnails come from the same two originals with fit=fillcrop, with a 320-pixel
candidate for 2× screens. Every image on the page is a rendering of a file from Step 1; a window
size that calls for a width nobody has requested before triggers a new render.
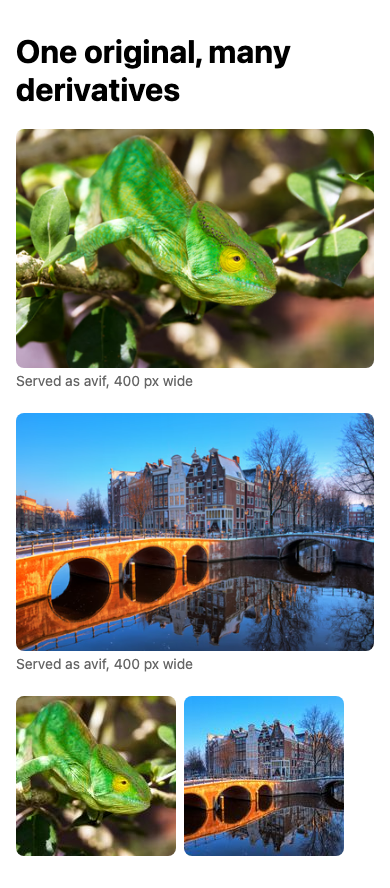
gallery.html now contains signed URLs. They work until the rounded expiry from cdn.js — one to
two days — so regenerate the page after that, and keep it out of version control
(echo '*.html' >> .gitignore). In an application you would produce these URLs on the server for
each page render instead of writing a file.
Step 4 (optional): not just images
The same URL scheme works for every file in your storage, and for the most common case — a
preview image of anything — there is no Template to create. builtin/storage-preview@0.0.1 ships
with Transloadit Storage, next to the builtin/storage-serve Template from
the previous post. It runs
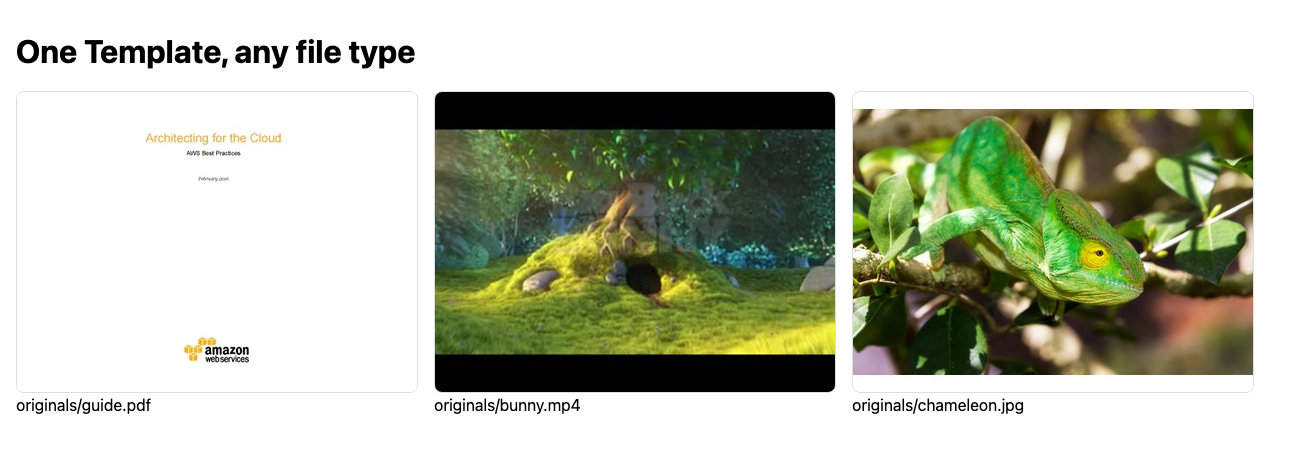
/file/preview, which turns any file into a preview image — the first page of a document, a frame
of a video, artwork or a waveform for audio, an icon when nothing better exists — exactly what a
media library needs for its thumbnail column. Like every built-in over Storage it answers signed
URLs only, and it takes parameters the same way your own Template does: w and h (default
400×300), f (format, default jpg), q (quality 1–100, default 75), and r (resize strategy,
default pad).
Build a page with a preview of each original — the PDF and the video included:
import { writeFile } from 'node:fs/promises'
import { cdnUrl } from './cdn.js'

const files = ['originals/guide.pdf', 'originals/bunny.mp4', 'originals/chameleon.jpg']
const attr = (url) => url.replaceAll('&', '&')

const card = (path) => `
<figure>
  <img src="${attr(cdnUrl('builtin/storage-preview@0.0.1', path))}" width="400" height="300" alt="Preview of ${path}">
  <figcaption>${path}</figcaption>
</figure>`

await writeFile(
  'previews.html',
  `<!doctype html>
<html lang="en">
<meta charset="utf-8">
<meta name="viewport" content="width=device-width, initial-scale=1">
<title>Previews</title>
<style>
  body { font: 16px system-ui; margin: 2rem auto; padding: 0 1rem; max-width: 1300px; }
  main { display: flex; flex-wrap: wrap; gap: 1rem; }
  figure { margin: 0; }
  img { max-width: 100%; height: auto; border-radius: 8px; border: 1px solid #ddd; }
</style>
<h1>One Template, any file type</h1>
<main>${files.map(card).join('\n')}</main>
`,
)
console.log('Wrote previews.html')
node --env-file=.env previews.js && open previews.html
The PDF shows its first page, the video a frame, the photo itself. The first request for the video preview took a few seconds in this example. Later requests can use the cached preview until it expires or is evicted.
/document/thumbs with page: '${fields.page}'), crops that keep faces in frame
(/image/facedetect), your own waveform colors? Create your own Template exactly like Step 2;
most Robots (85 of 102 at the time of writing) can be used this way. The exceptions are the heavy
video Robots (/video/encode, /video/thumbs, and friends): run those as normal Assemblies with
/transloadit/import and store the results next to the original.
Transform forever
The point of keeping only originals is what happens when requirements change:
- A new size, crop, or quality is a new URL. No batch job, no migration, no new variant in storage.
- A new capability is a field in the Template. Add
colorspace: '${fields.color}'to theresizedstep withcolor: 'sRGB'infields, runcreate-template.jsagain, and every image you have ever stored can be served in grayscale with?color=Gray. The files are not touched. - A new format — AVIF today, whatever comes next — is
format=in the URL. - A replaced original (
aws s3 cpto the same path) is a new version of the file, and new derivatives render from it. Derivatives that are already cached stay cached until they expire; if you need them replaced immediately, add a parameter (v=2) to the URLs you sign, which makes them new URLs.
You pay for renders and for the originals, not for variants you might need one day, and caching makes renders rare.
Reference: the URL
https://<workspace>.tlcdn.com/<template>/<path>?<params>&auth_key=…&exp=…&sig=…
<path>is the file's path in your storage; it arrives in the Template as${fields.input}.- Every other query parameter becomes
${fields.<name>}; a parameter that repeats becomes an array.expandsigare consumed by the signature check and are not fields. - The Template's own
fieldsobject supplies defaults for parameters the URL does not set. expis when the URL stops working, in milliseconds since the epoch; the response'sCache-Controlnever outlives it.sigis an HMAC over the whole URL with your Smart CDN secret, so any change to path or parameters invalidates it. Templates created withrequire_signature_auth: 1(and the built-instorage-serveandstorage-previewTemplates) serve nothing without one.
What just happened
- The originals went into Transloadit Storage once, with the S3 tool you already had.
- One Template, driven by URL parameters with defaults, produced every image derivative the page asked for — three formats, three widths, square crops — on demand.
- The built-in
storage-previewTemplate gave a PDF and a video the same treatment, with no Template to create. - Nothing was pre-rendered, nothing was re-processed, and only signed URLs are served.
Where to go next
- Move an existing library through a local staging directory: download with the source service’s
endpoint and credentials, then sync that directory into your workspace’s
originals/prefix using the Transloadit Storage endpoint and Auth Key/Secret. Keep the paths your app signs. - Let users upload straight into the same storage with the
/transloadit/storeRobot — see Store uploads and results without setting up a bucket. - An embeddable File Library is in development in
Uppy's Storage provider PR. The
@uppy/transloadit-storagepackage is not published yet; browse these files with an S3 client while that integration is being prepared.