

Upscale and enhance low-res images in one Assembly

Make small, washed-out photos usable for listings, banners, and prints before you store them. Our /image/enhance and /image/upscale Robots improve tone and add pixels inside the same Assembly that resizes and stores your uploads. Below, we turn a 480-pixel photo into a sharper, more colorful 1,920-pixel JPEG.
What the two Robots do
The 🤖 /image/upscale Robot
enlarges an image with an AI model instead of stretching its pixels. Its default model,
nightmareai/real-esrgan, supports scale: 2 and scale: 4, doubling or quadrupling each dimension
while rebuilding edges and texture. Other supported models can return different dimensions for
the same scale, so this walkthrough uses the default. This Robot is in beta.
The 🤖 /image/enhance Robot
uses ImageMagick adjustments with its default engine: "classic", which we use here. enhance
sets how hard it works (auto, auto_gentle, auto_aggressive, or none), sharpen and denoise
take a value from 0 to 10, and preset applies one of 13 color grades, such as warm, vintage,
or bw_classic. Classic enhancement keeps the format and dimensions of supported images;
unsupported types pass through unchanged.
Both are regular Steps in an Assembly, next to 🤖 /image/resize, 🤖 /image/optimize, and your storage Robot. You do not need to sign up with a separate AI vendor, manage another API key, or download and re-upload files between services.
Before and after
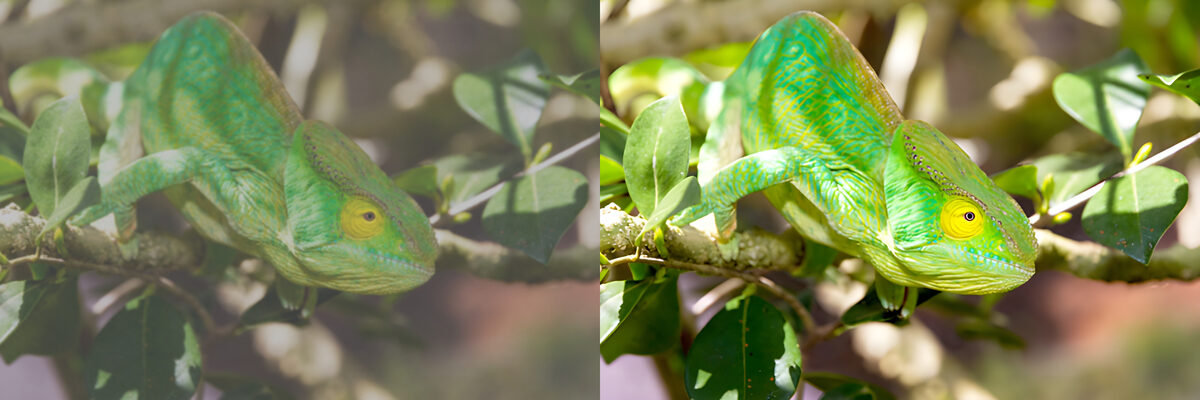
To show the effect, we took our chameleon demo photo and turned it into a bad upload: 480 pixels wide, with the contrast pulled down. The same Assembly then enhances that copy, upscales it 4×, and converts the result to JPEG:
{
  "steps": {
    "imported": {
      "robot": "/http/import",
      "url": "https://demos.transloadit.com/inputs/chameleon.jpg"
    },
    "low_res": {
      "use": "imported",
      "robot": "/image/resize",
      "width": 480,
      "contrast": 0.6,
      "result": true
    },
    "enhanced": { "use": "low_res", "robot": "/image/enhance", "enhance": "auto_aggressive" },
    "upscaled": { "use": "enhanced", "robot": "/image/upscale", "scale": 4 },
    "web": { "use": "upscaled", "robot": "/image/resize", "format": "jpg", "result": true }
  }
}
We run /image/enhance first, on the small file, so the upscaler starts from a well-exposed image
and enhance has fewer pixels to process. Save the JSON as instructions.json next to this script,
fix-upload.mjs, which uses our Node.js SDK:
import { readFile } from 'node:fs/promises'
import { Transloadit } from '@transloadit/node'

const client = new Transloadit({
  authKey: process.env.TRANSLOADIT_KEY,
  authSecret: process.env.TRANSLOADIT_SECRET,
})

const assembly = await client.createAssembly({
  params: JSON.parse(await readFile('instructions.json', 'utf8')),
  waitForCompletion: true,
})

for (const [step, [file]] of Object.entries(assembly.results)) {
  console.log(`${step}: ${file.meta.width}×${file.meta.height} ${file.ssl_url}`)
}
With Node.js 20.10.0 or newer, install the SDK, add your credentials, and run it:
npm install @transloadit/node
export TRANSLOADIT_KEY=MY_AUTH_KEY
export TRANSLOADIT_SECRET=MY_SECRET_KEY
node fix-upload.mjs
Our production test took about nine seconds end to end and printed this, with URLs shortened:
$ node fix-upload.mjs
low_res: 480×320 https://…/1e93be86….jpg
web: 1920×1280 https://…/791f086a….jpg
Below, on the left, is the 480-pixel low_res file stretched to 1920 pixels with a regular resize.
On the right is the web result.
Zooming in on the head shows what the upscaler adds: crisp scales, a defined eye, and clean edges.
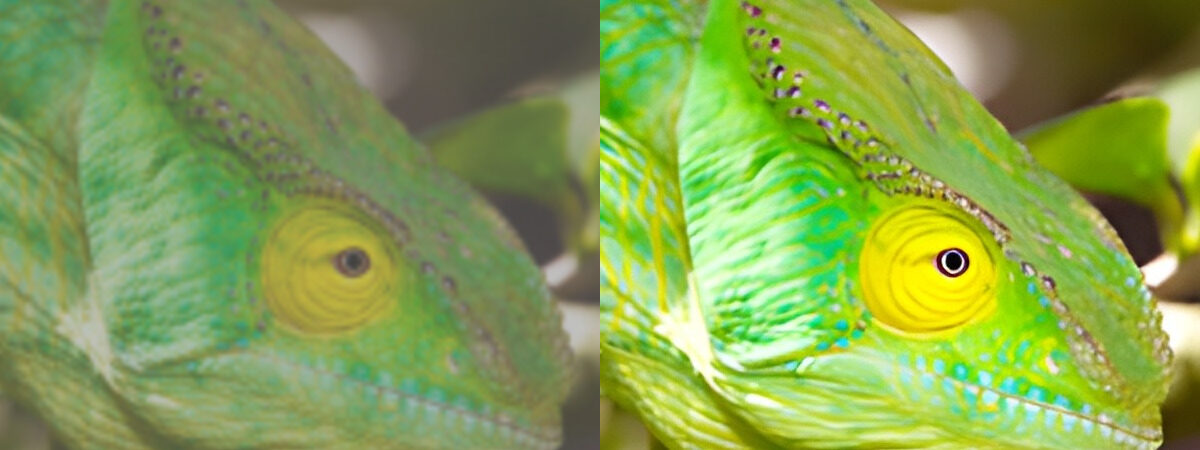
The model invents plausible detail rather than recovering what the camera missed. That is a good trade for a listing, a hero banner, or a print, but not for photos that need to be forensically accurate.
Using it on real uploads
In production, you would run this on files that your users upload, and only on the ones that need it. Here, 🤖 /file/filter lets images smaller than 1,200 pixels on both sides through, and everything else skips the extra work:
{
  "steps": {
    ":original": { "robot": "/upload/handle" },
    "small": {
      "use": ":original",
      "robot": "/file/filter",
      "condition_type": "and",
      "accepts": [["${file.meta.width}", "<", 1200], ["${file.meta.height}", "<", 1200]]
    },
    "enhanced": { "use": "small", "robot": "/image/enhance", "enhance": "auto", "sharpen": 3 },
    "upscaled": { "use": "enhanced", "robot": "/image/upscale", "scale": 2 },
    "optimized": { "use": "upscaled", "robot": "/image/optimize", "result": true }
  }
}
Add a storage Robot, such as 🤖 /s3/store, after optimized and save
the Instructions as a Template, so your upload form only has to reference
it. The filtered-out originals are not sent to optimized; store those separately if you need to
keep every upload.
Limits and pricing
- /image/upscale is in beta. We are still tuning it, so tell us how it does on your images.
- /image/upscale always outputs PNG. If you need a JPEG, end with an /image/resize Step, as in the first example.
- /image/upscale is meant for small images. With the default model, inputs above roughly 2.1 megapixels after the Robot's own size reduction exceed the model's GPU limit. Resize or filter large photos first, as the recipe above does.
- Classic /image/enhance is billed like our other image Robots. /image/upscale runs a GPU model and uses more of your plan per image than a resize. See the Robot pricing page.
Related reading
If you are cleaning up product photos, pair these Robots with background removal. And when there is no photo to start from, AI image generation creates one in the same Assembly.
Ready to try it? Sign up for free, read the docs for 🤖 /image/upscale and 🤖 /image/enhance, and let us know what you build.