

Content-aware cropping: keep the subject in frame

When you crop one photo into a wide banner, a square thumbnail, and a tall story, a center crop
often cuts away the very thing people came to see. Starting today, the
🤖 /image/resize Robot can find
the most interesting part of an image and crop around it. Set gravity to attention or entropy,
and your crops follow the subject instead of the geometric center.
Why a center crop is not enough
Most sites need the same image in several shapes. With the
fillcrop resize strategy, the Robot scales an image
until it covers the target size and cuts off whatever sticks out. So far, gravity let you choose
which part to keep, such as top or bottom-right. That works when every image in your catalog is
composed the same way. It falls apart with user uploads, marketplace listings, or photos from
different photographers, where the subject can be anywhere.
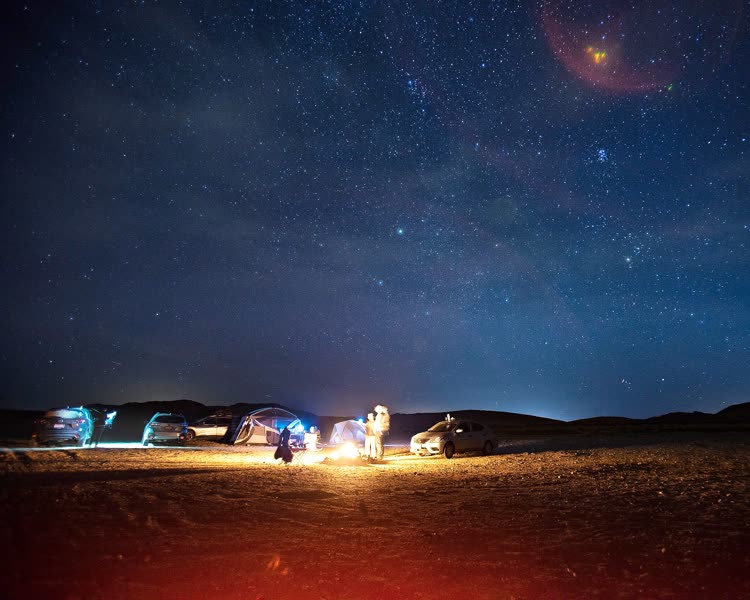
Take our desert demo photo. The campsite sits in the lower third, under a big starry sky:
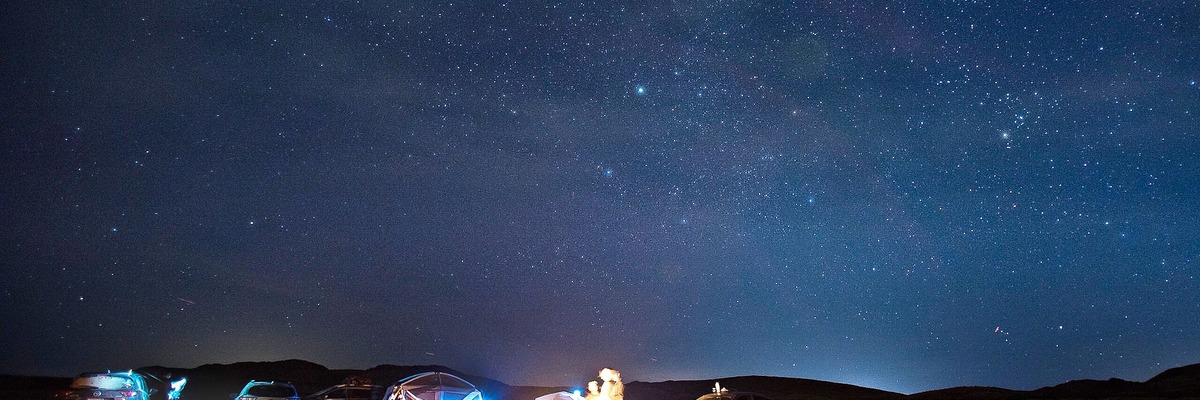
Crop it to a 1200×400 banner from the center, and you get a lot of sky, with the campsite sliced off at the bottom edge:
Let the Robot pick the crop
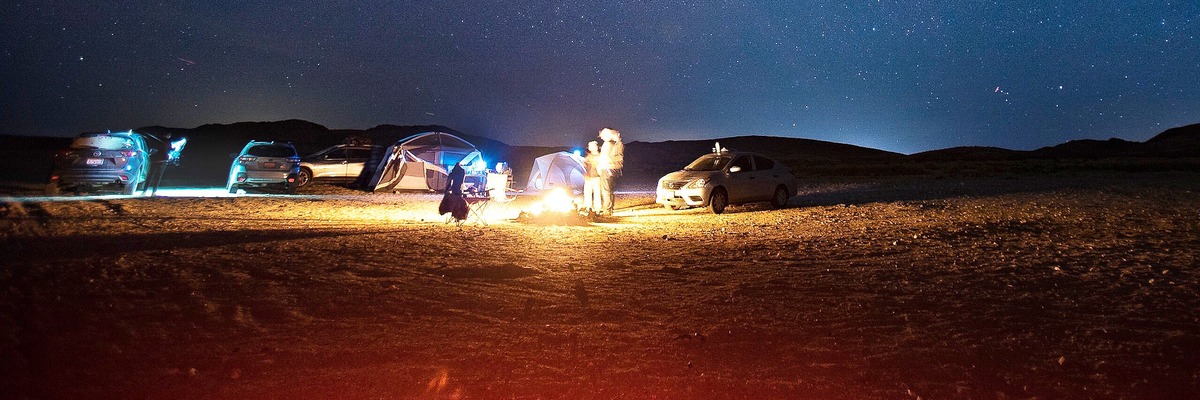
Now the same Step with gravity set to attention. The Robot looks for the region most likely to
draw the eye and keeps that in frame:
You can choose between two strategies:
attentionfavors areas with high luminance frequency, color saturation, and skin tones. That is what picked out the lit-up campsite here.entropykeeps the region with the most visual information, measured as Shannon entropy. On the desert photo, it also kept the campsite in frame, with a little more sky above it.
Both strategies run inside the same resize operation. You do not need an extra Step, a machine learning model, or a list of coordinates per image.
Try it
These Assembly Instructions import the demo photo and turn it into the banner above:
{
  "steps": {
    "imported": {
      "robot": "/http/import",
      "url": "https://demos.transloadit.com/inputs/desert.jpg"
    },
    "banner": {
      "robot": "/image/resize",
      "use": "imported",
      "width": 1200,
      "height": 400,
      "resize_strategy": "fillcrop",
      "gravity": "attention"
    }
  }
}
Next to it, save this small script that runs the Assembly with our Node.js SDK and prints each result:
import { readFile } from 'node:fs/promises'
import { Transloadit } from '@transloadit/node'

const client = new Transloadit({
  authKey: process.env.TRANSLOADIT_KEY,
  authSecret: process.env.TRANSLOADIT_SECRET,
})

const params = JSON.parse(await readFile('crop.json', 'utf8'))
const assembly = await client.createAssembly({ params, waitForCompletion: true })

for (const [step, files] of Object.entries(assembly.results)) {
  for (const file of files) {
    console.log(step, `${file.meta.width}x${file.meta.height}`, file.ssl_url)
  }
}
Install the SDK, add your credentials, and run it:
npm install @transloadit/node
export TRANSLOADIT_KEY=MY_AUTH_KEY
export TRANSLOADIT_SECRET=MY_SECRET_KEY
node crop.mjs
$ node crop.mjs
banner 1200x400 https://…/09dbfdd3….jpg
Change attention to center, which is the default, and run it again to get the center crop from
earlier. To crop your users' uploads instead of a demo file, swap the /http/import Step for
:original in a Template. From there, you can add a Step
per format, such as a square thumbnail and a 9:16 story, each with its own width, height, and
gravity.
When you still get a center crop
A few things to keep in mind:
- Use it with
fillcrop.attentionandentropypick what to keep when the Robot has to cut the image to fit. Withresize_strategy: "crop", you pass explicit coordinates instead. - Some options and formats use a different engine. A few features of the Robot run through
ImageMagick, and there
attentionandentropyfall back to a center crop. In our tests, that was the case forsepia,textoverlays, and HEIC input. The same goes for other ImageMagick-only options, such asclut,monochrome, andblur_regions, and for input formats other than JPEG, PNG, WebP, GIF, TIFF, JPEG XL, and SVG. When that happens, the Assembly Status includes a warning that names the Step, so you can spot it in your results. You can work around this by splitting the work into Steps. Convert HEIC to JPEG first, crop withattentionnext, and add text or effects in a final/image/resizeStep that uses the cropped result. - It is a heuristic, not an object detector.
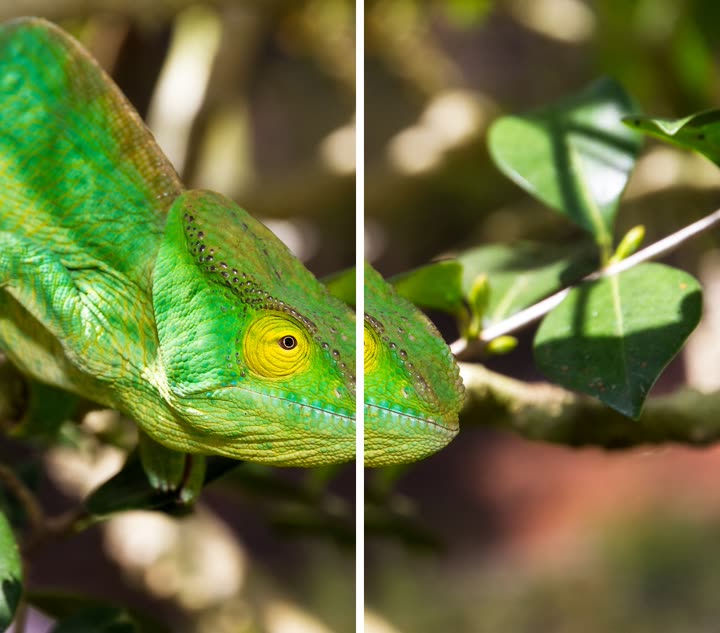
attentionlooks at detail, saturation, and skin tones, not at what is actually in the picture. When we cut our chameleon demo photo into a 9:16 story, the center crop (left) kept the eye, whileattention(right) went for the sunlit leaves next to it:
Try both strategies on a sample of your own images before you switch a whole catalog over. If your images are mostly portraits, the 🤖 /image/facedetect Robot can crop around the faces it finds. We walked through its options in Exploring the new 'faces' parameter.
Get started
Content-aware cropping is available now in the /image/resize Robot, and it is billed like any
other resize. The gravity documentation lists all accepted
values. If you do not have an account yet, you can sign up for free and run the
example above in a few minutes. If you have questions about your own images,
let us know.